2012년 5월 29일 화요일

emacs & cscope

출처 : http://stdnstr.tistory.com/106


emacs & cscope

TIPs 2010/01/21 12:05
참조 :
KLDP
http://www.cs.cmu.edu/cgi-bin/info2www?(emacs)Find%20Tag
Ubuntu forums
Blog

ETAGS

tag 생성
$ find . -name '*.[csSh]' | etags -
$ find . -name '*.cc' -or -name '*.h' | etags -

M-. TAG        Find first definition of TAG (`find-tag').
M-*            Pop back to where you previously invoked `M-.' and friends.
C-u M-.        Find next alternate definition of last tag specified.
C-u - M-.      Go back to previous tag found.
C-M-. PATTERN  Find a tag whose name matches PATTERN (`find-tag-regexp').
C-u C-M-.      Find the next tag whose name matches the last pattern used.
C-x 4 . TAG    Find first definition of TAG, but display it in another window (`find-tag-other-window').
C-x 5 . TAG    Find first definition of TAG, and create a new frame to select the buffer (`find-tag-other-frame').


CSCOPE

cscope download : http://cscope.sourceforge.net/
emacs el package load : (require ‘xcscope)
xcscope.el : /usr/share/emacs/site-lisp
Database 생성 : cscope-index-files

C-c s s     Find symbol.
C-c s d     Find global definition.
C-c s g     Find global definition (alternate binding).
C-c s G     Find global definition without prompting.
C-c s c     Find functions calling a function.
C-c s C     Find called functions (list functions called from a function).
C-c s t     Find text string.
C-c s e     Find egrep pattern.
C-c s f     Find a file.
C-c s i     Find files #including a file. 

2012년 5월 28일 월요일

[Guide] Mac OS X 10.7 Lion on VirtualBox with Windows 7 and Intel PC

출처 : http://www.sysprobs.com/guide-mac-os-x-10-7-lion-on-virtualbox-with-windows-7-and-intel-pc


[Guide] Mac OS X 10.7 Lion on VirtualBox with Windows 7 and Intel PC

Finally I managed to find out the working method to install and run latest Mac OS X 10.7 Lion on Oracle VirtualBox with normal Intel computer. The main issue every hackintosh users faced with Lion, is the boot loader to start the installation in normal PC or in any desktop virtualization software. Here I explain and demonstrate step by step method to install Mac OS X 10.7 Lion on VirtualBox in Windows 7 host Intel computer.
Please note this is just for testing and learning purpose only. This method is not recommended for production or long term use, also not all applications will be working on Mac Lion virtual machine as its not recommended by Apple company. Highly advisable to go with original Apple hardware and Mac OS to get the all features and power of Mac.
OK, I demonstrate these steps in my Windows 7 32 Bit computer with Oracle VirtualBox 4.1.2.

My PC Configurations.

Intel Core2Duo 2.66GHz, 3GB RAM on Host and Windows 7 32 Bit Operating System. Hardware Virtualization Technology (VT) is enabled in the host processor and processor is 64 bit ready.

What You Need?

1) Oracle VirtualBox 4.1 or later.  (Install the latest VirtualBox extension pack also)
2) The pre created Lion OS X installation disk. This is the very important part in this installation. The ordinary installation DMG file you download from Apple or any torrent sites will not work here. We need to modify some packages and create a new disk which can be booted in VirtualBox or VMware.
For this process, you must have a working Snow Leopard on physical or virtual machine.
The procedure is already covered in Sysprobs clearly, please check this guide on creating bootable Lion OS X disk.
I have used this pre created disk to boot and install Lion OS X in VMware workstation, which is already covered here.
The bootable Lion OS X disk can be created by two methods,
a) Create as a VMDK or VDI file. So this file can be attached to the virtual machine as the first disk to boot the Lion OS. This file can be used in VMware and VirtualBox whenever needed.
b) Create an ISO file. This is also ideal method to use with all virtualization software and physical computer also.
One of my reader created a nice video on creating bootable Lion OS X ISO file from DMG.

3) Minimum 1GB memory to Virtual machine.
5) Download the boot loader which can boot the Lion OS in VirtualBox (HackBoot.iso which is uploaded by me, no virus.)

How to Install Lion OS X on VirtualBox

1) Double check the VT support and 64Bit in BIOS. If its not enabled, then enable it in BIOS and make sure the host Operating System is detecting it.
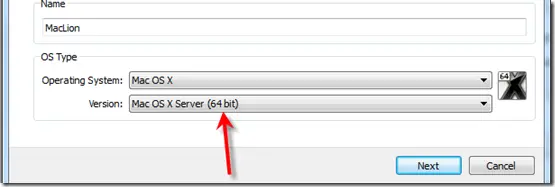
2) Create a new virtual machine. OS is Mac OS X , the version should be “64bit”. Do not ask me why, because normal 32bit version did not work on my computer.
Lion OS X 64bit version
3) Set the memory size to 1GB or more than that, 2GB is recommended.
4) Create a virtual hard disk, minimum is 20GB.
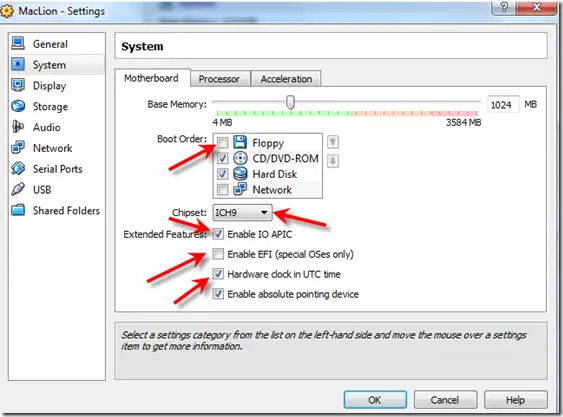
5) Here is System settings.
You can deselect the floppy drive.
Make sure ‘Enable IO APIC” and others are selected as shown below.
Remove the Enable EFI option. Leave the ICH9 chipset as default.
Mac OS X 10.7 System Settings in virtualbox
Under Acceleration, “Enable VT-x/AMD-V” and “Enable Nested Paging” should be enabled. If Acceleration tab is missing in your VirtualBox settings, it means VT is not enabled in host computer BIOS.
desktop virtualization software
Processor Settings.
This is slightly tricky. My processor is Core2Duo, so I could select 2 processors. Unfortunately during the installation the virtual machine crashed. I had to put it back to 1 processor (core). If you are using Intel i-series processor you can increase the number up to 4. Increase to maximum and try, if it doesn’t work then try with single core (1 processor).
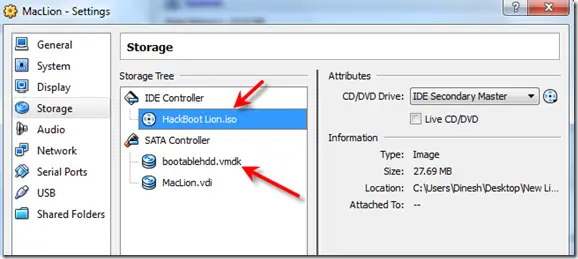
6) Attach the bootable ISO or VMDK file to virtual machine. In all cases we have to set Hackboot.iso in CD drive and boot with it.
If you are trying to install with bootable VMDK file (which I did), here is the setup.
lion on virtualbox
If you are going to try with ISO file, then you do not need to add the ‘bootabelhdd.vmdk’ file.
7) Start the Lion OS X virtual machine now in VirtualBox.
It will boot with HackBoot.iso file.
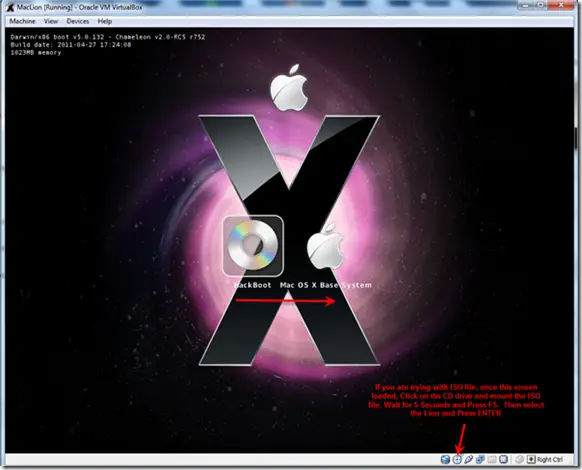
If it’s from VMDK file, select the disk by pressing right arrow key in keyboard and press ENTER.
lion boot loader for virtualbox
If you are trying with ISO file, then once the above screen loaded, click on the CD icon of VirtualBox console and browse the Lion bootable ISO file. Wait for 5 seconds and press F5 to refresh the loaded CD, select it and press ENTER to start the installation.
8.) Are you lucky enough? The first screen should start normally. Select the language and continue.
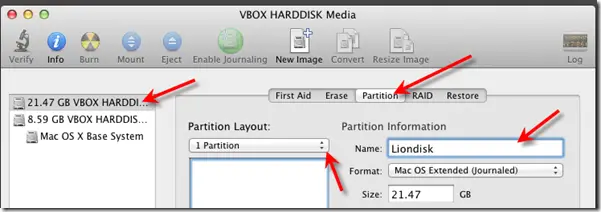
9) If you do not see the virtual hard disk to install, then it should be created in Disk Utility during the installation. Click on ‘Utilities’ and select ‘Disk Utility’.
create partition to install
Press Apply and close the disk utility box. Now you should be able to see and select the newly created partition for installation. Select and begin the process.
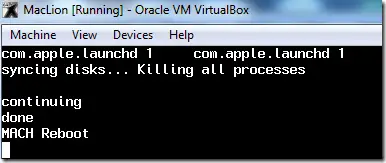
10) After the installation automatic restart will be attempted but it will not work here. The virtual machine will stop with following screen which is ready for manual restart.
reboot screen
Reset the virtual machine from menu. It may give a guru meditation error sometimes. Do not worry, just close the virtual machine.
We need to start the VM now, so load the HackBoot.iso file again to CD drive if it was removed during the installation. Incase virtual machine hangs with ash color screen now, again restart.
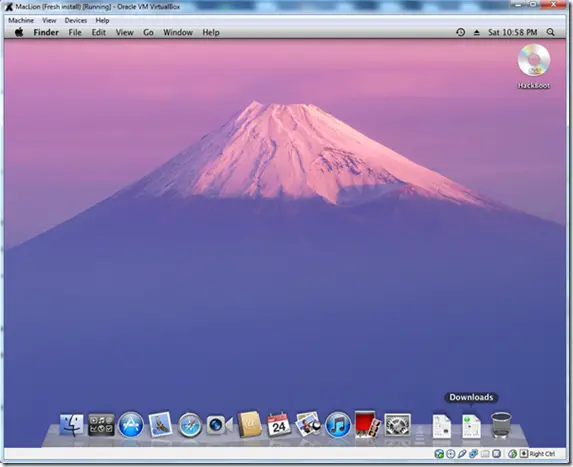
11) After few initial settings, you must land on working Lion OS X desktop in VirtualBox.
working lion os x in virtualbox
The performance of Lion OS X in VirtualBox is manageable. I could play around with few new changes and applications. Still there are few small drawbacks and issues on method. I will try my best to find out the solutions to fix them in future.

You must consider two issues now,

a) Shutting down and restart the Lion VM- This will not happen automatically. Once the black screen appears (Shown in Step 10), it’s safe to shutdown or reset from VirtualBox menu.
b) About the Mac – If you try ‘About the Mac’ inside virtual machine, it will not work. The virtual machine may crash.
I hope this guide would be helpful to install Mac OS X 10.7 Lion on VirtualBox with normal Intel computer with Windows 7, Vista or Windows XP. I’m NOT sure how this will work on AMD computer. Please someone leave comment about AMD processor.  Your responses are highly expected.
Have fun.


2012년 5월 23일 수요일

emacs config file

출처 : http://chaoxifer.egloos.com/1258767

;; Font
;(set-default-font "Lucida Grande")

; Color
(require 'color-theme)
(color-theme-initialize)
(set-foreground-color "white")
(set-background-color "#4D4F4F")
(set-fringe-style "none")

; Change Switch buffer key
(global-unset-key (kbd "C-x <LEFT>"))
(global-set-key (kbd "C-,") 'previous-buffer)

(global-unset-key (kbd "C-x <RIGHT>"))
(global-set-key (kbd "C-.") 'next-buffer)

; 소스파일 브라우저 (cscope를 먼저 설치한다)
; xcscope.el 파일을 복사한다
; M-x cscope-index-file <ret>
(require 'xcscope) ; cscope 설치 후 연동

; line number
(add-hook 'find-file-hook (lambda ()(linum-mode 1)))

; Easier Transition between Windows
; M-up, M-down, M-lest and M-right keys
(windmove-default-keybindings 'meta)

;emacs tab configuration
(setq c-basic-offset 4
          tab-width 4
          indent-tabs-mode t)

; 엔터 입력시 자동 들여쓰기 다른 방법
(load "cc-mode")
(define-key c++-mode-map "\r" 'reindent-then-newline-and-indent)
(define-key c-mode-map "\r" 'reindent-then-newline-and-indent)
(define-key java-mode-map "\r" 'reindent-then-newline-and-indent)

; compile and debug
(global-set-key (kbd "<f7>") 'compile)
(global-set-key (kbd "<f4>") 'next-error)
;(global-set-key (kbd "\C-[") 


; 나눔고딕 글꼴을 미리 설치한다
(set-fontset-font "fontset-default" '(#x1100 . #xffdc)  '("NanumGothicCoding" . "unicode-bmp")) ;;; 유니코드 한글영역
(set-fontset-font "fontset-default" '(#xe0bc . #xf66e)  '("NanumGothicCoding" . "unicode-bmp")) ;;;유니코드 사용자 영역

;------------------------------------------------------------
;; for colorful ls in the shell-mode
;------------------------------------------------------------
(ansi-color-for-comint-mode-on)


(setq compilation-auto-jump-to-first-error t) 
(setq make-backup-files nil) ; do not create back files
(setq gdb-many-windows t) ; gdb windows

(if (fboundp 'scroll-bar-mode) (scroll-bar-mode -1)) ; disable scroll bar
(if (fboundp 'tool-bar-mode) (tool-bar-mode -1)) ; disable tool bar
(if (fboundp 'menu-bar-mode) (menu-bar-mode -1)) ; disable menu bar

(custom-set-variables
  ;; custom-set-variables was added by Custom.
  ;; If you edit it by hand, you could mess it up, so be careful.
  ;; Your init file should contain only one such instance.
  ;; If there is more than one, they won't work right.
 '(frame-background-mode (quote dark))
 '(global-hl-line-mode t))
(custom-set-faces
  ;; custom-set-faces was added by Custom.
  ;; If you edit it by hand, you could mess it up, so be careful.
  ;; Your init file should contain only one such instance.
  ;; If there is more than one, they won't work right.
 '(default ((t (:inherit nil :stipple nil :background "#4D4F4F" :foreground "white" :inverse-video nil :box nil :strike-through nil :overline nil :underline nil :slant normal :weight normal :height 130 :width normal :foundry "unknown" :family "Lucida Grande"))))
 '(button ((((supports :underline t)) nil)))
 '(custom-button ((((type x w32 ns) (class color)) (:underline t))))
 '(custom-button-mouse ((((type x w32 ns) (class color)) (:background "#4D4F4F"))))
 '(custom-button-pressed ((((type x w32 ns) (class color)) (:background "#4D4F4F"))))
 '(font-lock-comment-face ((((class color) (min-colors 88) (background dark)) (:foreground "#FF7777"))))
 '(font-lock-function-name-face ((((class color) (min-colors 88) (background dark)) (:foreground "deep sky blue" :underline "ivory" :weight bold))))
 '(font-lock-keyword-face ((((class color) (min-colors 88) (background dark)) (:foreground "DeepSkyBlue1"))))
 '(font-lock-string-face ((((class color) (min-colors 88) (background dark)) (:foreground "LightSalmon"))))
 '(font-lock-variable-name-face ((((class color) (min-colors 88) (background dark)) (:foreground "cornsilk"))))
 '(fringe ((((class color) (background dark)) (:background "#4D4F4F" :foreground "#4D4F4F"))))
 '(hl-line ((t (:inherit highlight))))
 '(link ((((class color) (min-colors 88) (background dark)) (:foreground "light goldenrod" :underline nil))))
 '(mode-line ((((class color) (min-colors 88)) (:background "#4d5f5f" :foreground "white"))))
 '(mode-line-highlight ((((class color) (min-colors 88)) nil)))
 '(region ((((class color) (min-colors 88) (background dark)) (:background "gray"))))
 '(tool-bar ((nil nil)))
 '(variable-pitch ((default nil) (nil nil))))

Emacs 윈도용 설정파일

출처 : http://blog.naver.com/bonalena/20013545314


;;; =============================================================
;;; Fonts and Frame for Windows 95/NT
;;; =============================================================
; To see list of fonts in your Windows 95/NT,
; (w32-select-font) or
; (insert (prin1-to-string (x-list-fonts "*")))
(if (eq window-system 'w32)
    (progn
       ;(setq w32-enable-italics t)
       ;; for better font dialog menu for fontset
       (setq w32-use-w32-font-dialog t)
       (setq w32-enable-unicode-output t)
       (setq initial-frame-alist '((top . 10) (left . 30)))
       (setq default-frame-alist
           (append '( ;; Choose only one for your default font set.
       (font . "-outline-HyhwpEQ-normal-r-normal-normal-*-*-96-96-p-*-ksc5601.1987")
;       (font . "-outline-\307\321\304\304\265\270\277\362-normal-r-normal-normal-*-*-96-96-p-*-ksc5601.1987")
         (width . 100)
         (height . 52)
         (background-color . "gray85")
         (foreground-color . "Black")
         (vertical-scroll-bars . right))
           default-frame-alist))))

;;; =============================================================
;;; Mode Line and Minibuffer Settings
;;; =============================================================
;(icomplete-mode)
(partial-completion-mode 1)
(column-number-mode 1)
;; For bug fix of localized date output and better display for Korean
;(setq display-time-string-forms
;'((if
;     (and
;      (not display-time-format)
;      display-time-day-and-date)
;     (decode-coding-string (format-time-string "%m/%d (%a) " now)
;                           (car default-process-coding-system))
;   "")
;  (decode-coding-string
;   (format-time-string
;    (or display-time-format
;        (if display-time-24hr-format "%H:%M" "%p %-I:%M"))
;    now)
;   (car default-process-coding-system))
;  load
;  (if mail " Mail" "")))
(setq display-time-day-and-date t)
(display-time)

;;; =============================================================
;;; Misc. Setting
;;; =============================================================
;; In Unix terminal mode, make Backspace and Control-h key work as real backspace key.
;; (In any Emacs, F1 key work as an help key, too.)
(if (and (not (eq system-type 'windows-nt)) (null window-system))
    (keyboard-translate ?\C-h ?\C-?))
(setq scroll-step 1)
(global-set-key [?\C-x?\C-j] 'goto-line)
(setq query-replace-highlight t)
(show-paren-mode)
(transient-mark-mode 1)
(auto-compression-mode 1)  ; For auto compression and decompression

;;; =============================================================
;;; Syntax Highlighting, Spell Checking, Completion
;;; (ftp://ftp.hanq.net/pub/gnu/ (Source Code))
;;; (http://www.cat.rpi.edu/~tibbetts/ispell_toc.html (Windows 95/NT))
;;; =============================================================
(global-font-lock-mode 1)
(setq font-lock-maximum-decoration t)
;(setq font-lock-support-mode 'lazy-lock-mode)
(add-hook 'flyspell-mode-hook
   (function (lambda ()
        (define-key flyspell-mode-map "\M-\t"
   'flyspell-mode-complete))))
;(add-hook 'text-mode-hook 'turn-on-flyspell-mode)
(defun turn-on-flyspell-mode ()
  (flyspell-mode 1))
;; Enable fly spell checking only for strings and comments in program modes.
;; (font lock mode should be enabled for use of this feature)
;(add-hook 'c-mode-common-hook 'turn-on-flyspell-mode-program)
;(add-hook 'sh-mode-hook 'turn-on-flyspell-mode-program)
;(add-hook 'makefile-mode-hook 'turn-on-flyspell-mode-program)
;(add-hook 'emacs-lisp-mode-hook 'turn-on-flyspell-mode-program)
(defun turn-on-flyspelL-mode-program ()
  (setq flyspell-generic-check-word-p 'program-mode-flyspell-verify)
  (flyspell-mode 1))
(defun program-mode-flyspell-verify ()
  (let ((prop (get-text-property (point) 'face)))
    (or (eq prop 'font-lock-string-face)
 (eq prop 'font-lock-comment-face))))
(defun flyspell-mode-complete ()
  (interactive)
  (cond ((eq major-mode 'emacs-lisp-mode)
  (ispell-complete-word))
 ((or (eq major-mode 'latex-mode)
      (eq major-mode 'tex-mode))
  (or (TeX-complete-symbol)
      (ispell-complete-word)))
 (t
  (let ((prop (get-text-property (point) 'face)))
    (if (or (eq prop 'font-lock-string-face)
     (eq prop 'font-lock-comment-face))
        (ispell-complete-word)
      (let ((complete-func (lookup-key (current-local-map) "\M-\t")))
        (if complete-func
     (funcall complete-func)
   (complete-tag))))))))
(setq Info-default-directory-list
      (append '("/usr/local/teTeX/info/") Info-default-directory-list ))

;;; =============================================================
;;; Text Mode
;;; =============================================================
(setq default-major-mode (quote text-mode))
;(add-hook 'text-mode-hook
;          (function (lambda ()
;                      (setq fill-column 70)
;                      (turn-on-auto-fill))))
;;; =============================================================
;;; Programming Modes
;;; =============================================================
(c-add-style
 "java"
 '((c-basic-offset . 4)
   (c-comment-only-line-offset 0 . 0)
   (c-hanging-comment-starter-p)
   (c-offsets-alist
    (topmost-intro-cont . +)
    (statement-block-intro . +)
    (substatement-open . 0)
    (substatement . +)
    (inline-open . 0)
    (label . 0)
    (statement-case-open . +)
    (statement-cont . +)
    (knr-argdecl-intro . 5)
    (arglist-intro . +)
    (arglist-close . c-lineup-arglist)
    (brace-list-entry . 0)
    (access-label . 0)
    (inher-cont . c-lineup-java-inher)
    (func-decl-cont . c-lineup-java-throws))))
(add-hook 'java-mode-hook
   (function (lambda ()
        (c-set-style "java"))))
(add-hook 'c-mode-hook
   (function (lambda ()
        (c-set-style "stroustrup"))))
(add-hook 'c++-mode-hook
   (function (lambda ()
        (c-set-style "stroustrup"))))
(add-hook 'idl-mode-hook
   (function (lambda ()
        (c-set-style "stroustrup"))))

;;; =============================================================
;;; Compilation Modes
;;; =============================================================
; To avoid cursor disappearing problem.
; There should be better solution.
(if (and (eq system-type 'windows-nt)
         (null window-system))
    (progn
      (setq-default grep-command "grep -n -e")
      (setq-default grep-find-command
                    '("find . -type f -exec grep -n -e {} /dev/null \\;" . 32))
      (setq-default grep-find-use-xargs nil)))

;;; =============================================================
;;; Version Control
;;; =============================================================
(setq vc-make-backup-files t)

;;; =============================================================
;;; Settings for Non-standard Packages
;;; =============================================================
;;; =============================================================
;;; Crypting
;;; ftp://archive.cis.ohio-state.edu/pub/emacs-lisp/misc/crypt++.el.Z
;;; http://www.cs.washington.edu/homes/voelker/ntemacs.html
;;; =============================================================
(condition-case nil
    (require 'crypt++)
  (error nil))
;;; =============================================================
;;; Calcualtor (ftp://ftp.hanq.net/pub/gnu/calc-2.02f.tar.gz)
;;; =============================================================
;;; Commands added by calc-public-autoloads on Mon Oct  6 21:31:58 1997.
(autoload 'calc-dispatch    "calc" "Calculator Options" t)
(autoload 'full-calc     "calc" "Full-screen Calculator" t)
(autoload 'full-calc-keypad    "calc" "Full-screen X Calculator" t)
(autoload 'calc-eval     "calc" "Use Calculator from Lisp")
(autoload 'defmath     "calc" nil t t)
(autoload 'calc      "calc" "Calculator Mode" t)
(autoload 'quick-calc     "calc" "Quick Calculator" t)
(autoload 'calc-keypad     "calc" "X windows Calculator" t)
(autoload 'calc-embedded    "calc" "Use Calc inside any buffer" t)
(autoload 'calc-embedded-activate  "calc" "Activate =>'s in buffer" t)
(autoload 'calc-grab-region    "calc" "Grab region of Calc data" t)
(autoload 'calc-grab-rectangle    "calc" "Grab rectangle of data" t)
(global-set-key "\e#" 'calc-dispatch)
;;; End of Calc autoloads.

;;; =============================================================
;;; HTML Helper Mode (http://www.santafe.edu/~nelson/tools/)
;;; =============================================================
(autoload 'html-helper-mode "html-helper-mode" "Yay HTML" t)
;(setq auto-mode-alist (append '(("\\.html$" . html-helper-mode)
;                                ("\\.jsp$" . html-helper-mode))
;                              auto-mode-alist))
(add-hook 'html-helper-load-hook '(lambda () (require 'html-font)))
(add-hook 'html-helper-mode-hook '(lambda () (font-lock-mode 1)))
(setq html-helper-do-write-file-hooks t)
(setq html-helper-build-new-buffer t)

;;; =============================================================
;;; AUC TeX - Integrated environment for editing LaTeX files.
;;; (ftp://ftp.dante.de/tex-archive/support/auctex)
;;; teTeX, MikTeX (http://free.kaist.ac.kr/ChoF/)
;;; =============================================================
(condition-case nil
    (require 'tex-site)
  (error nil))
(add-hook
 'TeX-mode-hook
 (function
  (lambda ()
    (define-key TeX-mode-map "\C-x`" 'TeX-next-error)
    (define-key LaTeX-mode-map "\C-x`" 'TeX-next-error))))
(if (eq system-type 'windows-nt)
    (setq TeX-view-style '(("^a5$" "yap %d -paper a5")
                           ("^landscape$" "yap %d -paper a4r -s 4")
                           ("." "yap %d"))))

;;; =============================================================
;;; JDE - Java Development Environment (http://sunsite.auc.dk/jde/)
;;; =============================================================
;;; Copy `/usr/local/share/emacs/20.3/site-lisp/jde-2.1.3/jtags*' to `/usr/local/bin/'
(condition-case nil
    (require 'jde)
  (error nil))
(if (eq system-type 'windows-nt)
    (setq jde-db-source-directories '("C:/jdk1.2/src/"))
  (setq jde-db-source-directories '("/usr/local/jdk1.2/src")))

;;; =============================================================
;;; Telnet (http://www.watchit.com/~iganza/jtelnet.html) for Windows 95/NT
;;; =============================================================
;; Install JDK from http://java.sun.com/
;; Change followings properly for your system configuration
(if (eq system-type 'windows-nt)
    (progn
      (setq jtelnet-java-path "java")
      ;; for JDK 1.2.x
      (setq jtelnet-class-arg "-cp")
      (setq jtelnet-class-path
     (concat
      (apply 'concat (mapcar
        (lambda (x) (if (= x ?/) "\\" (char-to-string x)))
        data-directory))
      "..\\site-lisp\\jtelnet"))
      ;; for JDK 1.1.x
      ;(setq jtelnet-class-arg "-classpath")
      ;(setq jtelnet-class-path
      ;      (concat "d:\\jdk1.1\\lib\\classes.zip;"
      ;              (apply 'concat (mapcar
      ;                              (lambda (x) (if (= x ?/) "\\" (char-to-string x)))
      ;                              data-directory))
      ;              "..\\site-lisp\\jtelnet")))
      (condition-case nil
   (require 'jtelnet)
 (error nil))))
 
;;; ================================================================================
;;; Talk (ftp://archive.cis.ohio-state.edu/pub/emacs-lisp/packages/etalk-0.8.tar.gz)
;;; ================================================================================
;;; Need to build and install "etalk" executable in Emacs bin directory.
(autoload 'etalk "etalk"
  "Talk to anyone on any machine through BSD talk protocol." t)
(autoload 'etalk-batch "etalk"
  "Talk to anyone on any machine through BSD talk protocol from command line." t)
(autoload 'etalk-mail "etalk"
  "Talk to anyone on any machine through mail as connector." t)
(autoload 'finger "finger"
  "Run finger on a host." t)

;;; =============================================================
;;; Misc.
;;; =============================================================
(autoload 'which "which" nil t)

;;; =============================================================
;;; Private Settting and Customization
;;; =============================================================
;; To see available colors, run `M-x list-colors-dislay'


(require 'cl)
(when enable-multibyte-characters
  (set-language-environment "Korean")
 
  (setq-default file-name-coding-system 'euc-kr)
  (setq default-korean-keyboard "3")
  ;; (setq input-method-verbose-flag nil
  ;;       input-method-highlight-flag nil)
  (prefer-coding-system 'euc-kr)
  (set-default-coding-systems 'euc-kr)
  (set-keyboard-coding-system 'euc-kr)
  (set-terminal-coding-system 'euc-kr)
  (define-key encoded-kbd-mode-map [27] nil)

;  (set-selection-coding-system 'compound-text-with-extensions)
(set-selection-coding-system
 (cond ((eq system-type 'windows-nt) 'euc-kr-dos)
       (t 'euc-kr)))

  ;; Hangul Mail setting
  (setq-default sendmail-coding-system 'euc-kr))
(unless (or enable-multibyte-characters window-system)
  (standard-display-european t)
  (set-input-mode (car (current-input-mode))
                  (nth 1 (current-input-mode))
                  0))

;; sealover's setup (by Learning GNU Emacs)
(setq default-major-mode 'text-mode)
(add-hook 'text-mode-hook 'turn-on-auto-fill)
(setq-default transient-mark-mode t)
;;(enable-flow-control)
(global-unset-key "\e\e")
(global-unset-key "\C-x\C-u")
(define-key global-map "\C-x?" 'help-command)
(define-key global-map "\C-h" 'backward-char)
;;(setq suggest-key-bindings nil)
(set-background-color "black")
(set-foreground-color "white")
(set-cursor-color "khaki")
(set-face-foreground 'region "white")
(set-face-background 'region "mediumblue")
;;;;(global-font-lock-mode 1 t)
;; mode-line color
(when enable-multibyte-characters
  (set-face-foreground 'modeline "blue")
  (set-face-background 'modeline "khaki"))
(unless enable-multibyte-characters
  (set-face-foreground 'modeline "Red")
  (set-face-background 'modeline "Yellow"))
;;shell environment
(setq-default shell-cd-regexp nil)
(setq-default shell-pushd-regexp nil)
(setq-default shell-popd-regexp nil)
;(setq explicit-shell-file-name "/usr/local/bin/bash")
;; secure on shell mode
(add-hook 'comint-output-filter-functions 'comint-watch-for-password-prompt)
(setq default-tab-width 4)
;; c-mode
(add-hook 'c-mode-hook '(lambda() (c-set-style "gnu")))
(global-font-lock-mode t)
(setq font-lock-maximum-decoration t)
(setq truncate-partial-width-windows nil)

MAC OS X에서 Emacs 사용

출처 : http://nadagill.egloos.com/816704


Emacs 설치
http://emacsformacosx.com/ 에 접속하면 바로 설치할 수 있다.
color-theme 설치
첨부한 color-theme를 Download 받는다.
$ cd ~/.emacs.d/vendor
$ tar xzvf color-theme.tar.gz
auto-complete 설치
첨부한 auto-complete을 Download 받는다.
$ cd ~/.emacs.d/vendor
$ tar xzvf auto-complete.tar.gz
cscope 설치
여기에서 package를 Download 받는다.
$ cd ~/.emacs.d/vendor
$ tar xzvf cscope-15.7a.tar.gz
$ cd cscope-15.7a
$ ./configure --prefix=/usr/local
$ sudo make install
이 작업이 완료돼면 다음과 같이 실행파일을 copy해 준다.
$ cd ~/.emacs.d/vendor/cscope-15.7a/contrib
$ cd xcscope
$ sudo cp cscope-indexer /usr/local/bin
.emacs의 설정
vi ~/.emacs
;; Command key is meta key 설정
(setq mac-option-key-is-meta t)
(setq mac-command-key-is-meta nil)
;; 환영 메세지 안보이게 설정
(setq inhibit-startup-message t)
;; windows size 설정
(set-frame-width (selected-frame) 180)
(set-frame-height (selected-frame) 50)
;; windows position 설정
(set-frame-position (selected-frame) 0 0)
;; color theme load
(add-to-list 'load-path "~/.emacs.d/vendor/color-theme")
(require 'color-theme)
(color-theme-initialize)
(color-theme-deep-blue)
;; font 설정
(when window-systemauto-complete.tar.gz
 (set-face-font 'default "-outline-Courier New-normal-normal-normal-mono-12-*-*-*-c-*-iso10646-1") ; 영문
 (set-fontset-font "fontset-default" '(#x1100 . #xffdc)  '("NanumGothic" . "unicode-bmp")) ; 한글
 (set-fontset-font "fontset-default" '(#xe0bc . #xf66e)  '("NanumGothic" . "unicode-bmp")) ; 사용자
)
;; cscope load
(add-to-list 'load-path "~/.emacs.d/vendor/cscope-15.7a/contrib/xcscope")
(require 'xcscope)
;; auto complete 설정
(add-to-list 'load-path "~/.emacs.d/vendor/auto-complete")
(require 'auto-complete-config)
(add-to-list 'ac-dictionary-directories "~/.emacs.d/vendor/auto-complete/ac-dict")
(ac-config-default)
;; 화면 분할
(split-window-horizontally)
;; 화면 크기 동일하게 설정
(balance-windows)
;; line number 표시
(global-linum-mode 1)
;; backup file 생성하지 않기 설정
(setq make-backup-files nil)
;; indent 설정
(defun linux-c-mode ()
  "C mode with adjusted defaults for use with the Linux kernel."
  (interactive)
  (c-mode)
  (c-set-style "K&R")
  (setq c-basic-offset 4))
(setq auto-mode-alist (cons '("/Users/nadagill/Project/linux.*-.*\\.[ch]$" . linux-c-mode)
    auto-mode-alist))
;; 선택된 영역 delete로 지우기
(delete-selection-mode nil)
;; key binding
;; hyper key binding
(setq mac-command-modifier 'hyper)
;; meta + arrow 창 전환
(windmove-default-keybindings 'meta)
;; goto line 설정
(global-set-key [(hyper l)] 'goto-line)
;; undo 설정
(global-set-key [(hyper z)] 'undo)
;; paste 설정
(global-set-key [(hyper v)] 'yank)
;; copy 설정
(global-set-key [(hyper c)] 'copy-region-as-kill)
;; cut 설정
(global-set-key [(hyper x)] 'kill-region)
;; find file 설정
(global-set-key [(hyper o)] 'find-file)
;; save 설정
(global-set-key [(hyper s)] 'save-buffer)
;; save & quit 설정
(global-set-key [(hyper q)] 'save-buffers-kill-emacs)
;; shell mode 진입
(global-set-key [(hyper shift s)] 'eshell)
;; compile 설정
(global-set-key [(hyper shift c)] 'compile)
;; scroll 설정
(global-set-key [(meta up)] 'scroll-down)
(global-set-key [(meta down)] 'scroll-up)
(global-set-key [(meta left)] 'beginning-of-line)
(global-set-key [(meta right)] 'end-of-line)
;; cscope 관련 key binding 설정
;; index file 만들기 설정
(global-set-key [(hyper a)] 'cscope-index-files)
;; find symbol
(global-set-key [(hyper /)] 'cscope-find-this-symbol)
;; previous symbol
(global-set-key [(hyper ,)] 'cscope-prev-symbol)
;; next symbol
(global-set-key [(hyper .)] 'cscope-next-symbol)
;; exec path 설정
(custom-set-variables
 '(exec-path (quote ("/usr/bin" "/bin" "/usr/sbin" "/sbin" "/Applications/Emacs.app/Contents/MacOS/bin" "/usr/local/bin" ))))
(custom-set-faces)

2012년 5월 17일 목요일

Finding Files with -prune

출처 : http://docstore.mik.ua/orelly/unix/upt/ch17_23.htm


17.23 Finding Files with -prune

find has lots of operators for finding some particular kinds of files. But find won't stop at your current directory - if there are subdirectories, it looks there too. How can you tell it "only the current directory"? Use -prune .
NOTE: If your version of find doesn't have -prune , this won't work. Try GNU find on the CD-ROM.
-prune prunes find 's search tree at the current pathname. So, if the current pathname is a directory, find won't descend into that directory for any further searches. The command line looks kind of hairy. Here's one to find all files from the current directory modified in the last 24 hours:
% 

find . \( -type d ! -name . -prune \) -o \( -mtime -1 -print \)


./afile
./cfile
I'll put that into an alias in a minute. First let's try to understand it - once you see the pattern, you'll understand some important things ( 8.5 , 17.12 ) about find that many people don't. Let's follow find as it looks at a few pathnames.
find looks at each entry, one by one, in the current directory ( . ). For each entry, find tries to match the expression from left to right. As soon as some part matches, it ignores the rest (if any) of the expression.
  1. When find is looking at the file named ./afile : The first part of the expression, \( -type d ! -name . -prune \) , doesn't match ( ./afile isn't a directory). So find tries the other part, after the -o (or).
    Has ./afile been modified in the last day? In this case, it has - so the -print (which is always true) prints the pathname.
  2. Next, ./bfile : Like the previous step, the first part of the expression won't match. In the second part, \( -mtime -1 -print \) , the file's modification time is more than one day ago. So this part of the expression is false;find doesn't bother with the -print operator.
  3. Finally, let's look at ./adir , a directory: The first part of the expression, \( -type d ! -name . -prune \) , matches. That's because ./adir is a directory ( -type d ), its name is not . ( ! -name . )-and so -prune , which is always true, makes this part of the expression true. find skips ./adir .
Your find may also have a -maxdepth option that gives the maximum number of directory levels to descend. For example, find . -maxdepth 0 operates only on the current directory.
Let's put the version with -prune into a couple of aliases. The first one, named find. (with a dot on the end of its name), just prints names with -print . The second alias gives a listing like ls -gilds . They work like this:
% 

find. -mtime -1


./afile
./cfile
% 

find.ls -mtime -1


43073   0 -r----  1 jerry    ora        0 Mar 27 18:16 ./afile
43139   2 -r-r-r-  1 jerry    ora     1025 Mar 24 02:33 ./cfile
The find. alias is handy inside backquotes ( 9.16 ) , feeding a pipe, and other places you need a list of filenames. Here are the aliases. The second one, find.ls , uses -ls instead of -print :
alias find. 'find . \( -type d ! -name . -prune \) -o \( \!* -print \)'
alias find.ls 'find . \( -type d ! -name . -prune \) -o \( \!* -ls \)'
(The Bourne shell versions on the CD-ROM are named Find and Findls because a dot isn't legal in a function name.)
If you don't want the ./ at the start of each name, add a pipe through colrm 1 2 ( 35.15 ) or cut -c3- ( 35.14 ) to the end of the alias definition.
JP

GNU find

출처 : http://beyondtop.egloos.com/10601955


Linux의 find 명령은 Linux 명령어 가운데 가장 유용하면서도 혼란스러운 명령어 가운데 하나로, 다른 명령어의 표준적인 구문과 다른 구문을 가지고 있다는 점에서 어렵다. 하지만, 파일명, 파일 유형, 사용자, 더 나아가 타임 스탬프 별로 파일을 찾을 수 있다는 점에서 powerful command다.
find 명령을 사용하면 이러한 속성을 자유롭게 조합해 파일의 위치를 찾을 수 있을 뿐만 아니라, 찾은 파일에 대해 또 다른 연산(명령어의 적용)을 수행할 수 있다.

기본 사용법

먼저, find 명령의 기본 구조는 다음과 같다.
find   start_directory  test  options   criteria_to_match action_to_perform_on_results
                          
다음 명령은 “java”라는 확장자를 가지고 있는 모든 파일을 PWD 내에서(하위 디렉토리 포함) 찿는다.
find . -name  "*.java"   
아래 명령어 역시 동일한 결과를 나타내게 되는데, 어떤한 경우든 escape 문을 통해 wildcard 문자를 일반 문자로 처리하도록 하여 find 명령에 전달시켜야 shell에 의해서 해석되지 않고 find 명령에 잘 전달된다. 따라서, 검색 문자열에 큰타옴표를 붙이거나 그 앞에 역슬래시(\)를 붙여야 한다.
find . -name  \*.java
find 명령을 수행할 때 검색할 위치를 지정하지 않은 경우에는 현재 디렉토리에서 검색이 시작된다.

아래 3개의 find 명령어를 실행하면 똑같이 현재 디렉토리와 하위 디렉토리, 숨겨진 파일을 모두 출력한다.
find find .find . -print
백업을 위해 검색 결과물에 전체 경로가 포함되기를 원한다면 find의 인자로 디렉토리를 입력할 때 전체 경로(absolute path)를 지정하면 된다.
find /home/bluher -name \*.java/home/bluher/plsql/REGEXPvalidate/src/oracle/otnsamples/plsql/ConnectionManager.java/home/bluher/plsql/REGEXPvalidate/src/oracle/otnsamples/plsql/DBManager.java/...
또한, 검색 문자열에 1개 이상의 시작 디렉토리를 지정할 수도 있습니다. 적정 권한을 가진 사용자로서 실행되는 경우, 아래 명령어는 모든 jar 파일을 찾기 위해 /usr, /home 및 /tmp 디렉토리 순서로 내려갈 것입니다:  
find /usr /home  /tmp -name "*.jar"
적절한 권한이 없는 사용자가 find 명령을 수행한 경우에는 다음과 같은 오류 메시지가 나올 수 있다:
find:  /tmp/orbit-root: Permission denied
다음과 같이 stderr(standard error)를 /dev/null로 보내도록 추가함으로써 오류 메시지가 출력되는 것을 제거할 수 있다.
find /usr /home  /tmp -name "*.jar" 2>/dev/null
기본적으로 find는 대/소문자를 구별한다. 대/소문자가 구별되는 find 버전을 사용할 경우, 대/소문자에 무관한 결과를 얻고자 할 경우에는 -name 옵션 대신 -iname 옵션을 사용하면 원하는 결과를 얻을 수 있다.
find downloads  -iname "*.gif"downloads/.xvpics/Calendar05_enlarged.gifdownloads/lcmgcfexsmall.GIF
또한, 파일명 외에도 유형(type)에 따라 파일을 검색할 수 있다. 다음 예는 현재 디렉토리의 모든 하위디렉토리를 검색한다.
find . -type d          
다음의 예는 /usr 디렉토리에 존재하는 모든 심볼릭 링크(symbolic link)를 찾고자 할 때 유용하게 사용될 수 있다.
find /usr -type l
root로 다음의 두 명령을 수행하면, /usr/bin 디렉토리에서 z로 시작하는 모든 파일들에 대한 링크와 링크가 가리키는 파일이 나타난다.
# find /usr/bin  -type l  -name "z*" -exec ls  -l {} \;lrwxrwxrwx 1 root  root 8 Dec 12 23:17 /usr/bin/zsh -> /bin/zshlrwxrwxrwx 1 root  root 5 Dec 12 23:17 /usr/bin/zless -> zmorelrwxrwxrwx 1 root  root 9 Dec 12 23:17 /usr/bin/zcat -> /bin/zcat
find /usr/bin -type  l  -name "z*" -ls
두 번째 명령의 경우에는 디렉토리와 inode 정보를 보여준다. -exec 및 –ls 실행은 뒤에서 다시 다뤄질 것이다.

find가 찾을 수 있는 다른 파일 유형으로는 다음과 같은 것들이 있다
   • b—block (buffered) special
   • c—character (unbuffered) special
   • p—named pipe (FIFO)
   • s—socket
   • f - normal file
   • d - directory
검색의 시작을 루트부터 하면 시스템 속도가 크게 느려질 수 있다. 명령어를 반드시 실행해야 한다면 사용량이 적은 시간대나 야간에 실행하는 것이 좋다.
find  /   -print > masterfilelist.out
여러 파일시스템을 마운트해서 사용하여 다량의 파일이 존재하는 Enterprise systems에서는 find 명령을 수행할 때는 여러 옵션들을 사용함으로써 시스템에 끼칠 수 있는 부하를 줄이는 것이 좋다. 이를 위해 가장 유용하게 사용할 수 있는 옵션은 –xdev와 -mount다.
이들 옵션은 MS-DOS, CD-ROM 또는 AFS와 같은 다른 파일 시스템 상의 디렉토리를 검색하지 않게 함으로써 검색의 범위를 좁혀준다. 그러므로 find 명령의 시작 디렉토리와 동일한 유형의 파일 시스템으로 검색을 제한할 수 있다.

듀얼 부팅 시스템의 경우 mount 명령어를 이용해서 다른 파일시스템을 Linux/Unix에서 마운트해서 사용하는 경우라면 이러한 옵션을 사용하여 부하를 줄일 수 있다. Windows 파티션이 관련되어 있다고 가정할 때 다음과 같이 마운팅할 수 있다.:
mount -t vfat  /dev/sda1 /mnt/msdos
df를 실행하거나 옵션없이 mount 명령만을 수행함으로써 파티션 마운팅 여부를 확인할 수 있다:
find /mnt/msdos  -name "*.txt" 2> /dev/null
MS Windows 파티션에서는 파일 목록이 길 수 밖에 없는데, -mount 또는 -xdev 옵션을 이용해 다음과 같이 명령을 수행해보라.
find / -name  "*.txt" -mount 2> /dev/null
또는
find / -name  "*.txt" -xdev 2> /dev/null
아래 예에서와 같이 -fstype 옵션을 이용해 찾고자 하는 파일 시스템을 정확하게 알려줄 수도 있다.
find / -name  "*.txt" -fstype vfat 2> /dev/null


시간 찾기

시스템의 타임 스탬프를 토대로 검색을 사용할 수 있는 여러 개의 옵션을 가지고 있다. 타임 스탬프로 사용할 수 있는 옵션으로는 다음과 같은 것들이 있다.
   • mtime파일 내용이 마지막으로 수정된 시간(modified time)
   • atime—파일을 읽기 또는 액세스한 시간(accessed time)
   • ctime—파일 상태가 변경된 시간(changed time)

mtime 및 atime의 의미는 그 자체로 쉽게 알 수 있지만, ctime는 좀 더 설명이 필요다.
inode는 각 파일에 대한 메타 데이터를 가지고 있기 때문에 파일이 변경되면 inode 데이터도 변경된다. 파일에 대한 심볼릭 링크 생성, 파일에 대한 권한 변경, 파일 이동 등과 같은 다양한 작업은 파일의 메타데이터를 변경시키며, 이러한 경우 inode가 변경된다. 파일 내용에 대한 읽기나 수정은 수행되지 않기 때문에  mtime 및 atime은 변하지 않지만 ctime은 변하게 된다. 이러한 시간 옵션은 각기 -n, n 또는 +n로 지정된 n 값을 함께 사용해야 한다.
• -n은 n 이하를 반환
• +n은 n 이상을 반환
• n은 정확히 n에 해당되는 값을 반환
보다 명확한 설명을 위해 몇 가지 예를 보자. 다음의 명령은 최근 1시간 동안 수정된 모든 파일을 찾아준다.
find . -mtime -1
./plsql/FORALLSample
./plsql/RegExpDNASample
/plsql/RegExpSample
-1 대신 1을 사용하면 정확하게 1시간 전에 수정된 모든 파일을 찾을 수 있다:
find . -mtime 1 
위의 예는 정확하게 일치하는 값을 대상으로 검색하기 때문에 모든 결과값이 나오지는 않을 수 있다. 다음 예는 1시간 이전에 수정된 파일을 찾아준다:
find . -mtime +1 
기본적으로 -mtime, -atime 및 –ctime는 최근 24 시간에 대한 타임 스탬프를 의미한다. 하지만, 뒤에 daystart 옵션을 붙이면 오늘을 시작으로 24시간 주기가 시작된다. 또한, mmin, amin 및 cmin을 사용하면 분 단위로 변경된 타임 스탬프를 찾을 수 있다.
로그인한 후 즉시 다음의 명령을 실행하면 최근 1분 내에 읽은 모든 파일을 찾을 수 있다:
find . -amin -1
./
./.bashrc
./.bash_history
./.xauthj5FCx1
find 명령으로 파일을 찾으면 메타 데이터의 일부인 파일의 액세스 시간(accessed time)이 변경된다는 사실에 주의해야 한다.

-newer, -anewer 및 –cnewer 옵션을 사용하면 특정 파일과 비교해 수정 또는 액세스된 파일을 찾을 수도 있다.
 이는 -mtime, -atime 및 –ctime과 비슷합니다.

• -newer : 보다 최근에 내용이 수정된 파일
• -anewer : 보다 최근에 읽기가 수행된 파일
• -cnewer : 보다 최근에 상태가 변경된 파일

마지막으로 생성한 tar.gz 파일 이후로 현재 디렉토리에서 어떤한 방법으로든지 수정된 파일을 모두 찾으려면 다음과 같이 명령을 수행하면 된다.
find . -newer  backup.tar.gz


크기에 따른 파일 찾기

-size 옵션은 지정된 크기 기준에 부합하는 파일을 찾아준다. 크기가 5MB 이상인 모든 파일을 찾으려면 다음과 같이 명령을 수행하면 된다.
find / -size  +5000000c 2> /dev/null
/var/log/lastlog
/var/log/cups/access_log.4
/var/spool/mail/bluher
마지막에 “c”를 붙이면 결과가 바이트 단위로 보고된다.(기본적으로 find 명령은 512 바이트 블록의 수로 크기를 보고한다.)
또한, “c”를 “k”로 교체하는 경우에는 킬로바이트 수로, “w”를 사용하는 경우에는 2바이트 워드의 수로 결과를 표시할 수 있다.

-size 옵션은 모든 제로 바이트 파일을 찾거나 이들 파일을 /tmp/zerobyte 폴더로 이동하기 위해 자주 사용된다.
다음 예는 바로 이러한 연산을 수행한다.
find test -type f  -size 0 -exec mv {} /tmp/zerobyte \;
-exec 옵션은 find 명령이 만나게 되는 파일에 대해 모든 쉘 명령어를 수행할 수 있도록 해준다.
후반부에서 이 옵션의 보다 다양한 사용 예를 확인할 수 있다. 중괄호를 사용하면 빈 파일 각각을 이동시킬 수 있다.
또한, -empty 옵션을 사용하면 빈 파일을 찾을 수 있다.
find test -empty        
test/foo
test/test


권한 및 소유권에 따른 파일 찾기

find 명령은 시스템 보안 모니터링을 위해 없어서는 안될 명령이다. 아래와 같이 기호법이나 8진법을 통해 사용 권한이 모두에게 열려있는 파일을 찾을 수 있다.
find . -type f  -perm a=rwx -exec ls -l {} \; 
또는
find . -type f  -perm 777 -exec ls -l {} \;
-rwxrwxrwx 1 bluher  users 0 May 24 14:14 ./test.txt
위의 두 명령의 경우 -exec ls –l을 수행하고 있기 때문에, 반환된 파일의 실제 사용 권한을 확인할 수 있으며, 위의 예는 “기타 사용자” 및 그룹이 모두 쓰기를 수행할 수 있는 파일을 찾아준다.
find plsql -type f  -perm -ug=rw -exec ls -l {} \; 2>/dev/null
또는
find plsql -type f  -perm -220 -exec ls -l {} \; 2>/dev/null 
-rw-rw-rw- 1 bluher users 4303  Jun  7   2004 plsql/FORALLSample/doc/otn_new.css
-rw-rw-rw- 1 bluher users 10286 Jan  12  2005  plsql/FORALLSample/doc/readme.html
-rw-rw-rw- 1 bluher users 22647 Jan  12  2005  plsql/FORALLSample/src/config.sql
..
아래 명령어들을 실행하면 사용자, 그룹 또는 둘 모두가 쓰기 작업을 할 수 있는 파일을 찾을 수 있다.
find plsql -type f  -perm /ug=rw -exec ls -l {} \; 2>/dev/null
또는
find plsql -type f  -perm /220 -exec ls -l {} \; 2>/dev/null
-rw-r--r-- 1 bluher users 21473  May  3 16:02 plsql/regexpvalidate.zip
-rw-rw-rw- 1 bluher users 4303  Jun  7   2004 plsql/FORALLSample/doc/otn_new.css
-rw-rw-rw- 1 bluher users 10286 Jan  12  2005  plsql/FORALLSample/doc/readme.html
-rw-rw-rw- 1 bluher users 22647 Jan  12  2005  plsql/FORALLSample/src/config.sql
웹이나 기존 매뉴얼에는 아래 명령어로 나와 있을 것입니다.
find . -perm +220  -exec ls -l {} \; 2> /dev/null 
+ 기호는 / 기호와 동일한 역할을 하지만, 새로운 버전의 GNU findutils에서는 권장되지 않고 있다.
시스템에서 쓰기 가능한 모든 파일을 찾으려면 아래와 같이 명령을 사용하면 된다.
find / -wholename  '/proc' -prune  -o  -type f -perm -0002 -exec ls -l {} \;
-rw-rw-rw- 1 bluher users 4303  Jun  7   2004/home/bluher/plsql/FORALLSample/doc/otn_new.css
-rw-rw-rw- 1 bluher users 10286 Jan  12  2005  /home/bluher/plsql/FORALLSample/doc/readme.html
...
4번째 사용 권한에 대해 앞으로 조금 더 다루겠지만, 마지막 필드의 “2”는 쓰기 비트로도 알려져 있는 파일 사용 권한의 “기타 사용자”에 해당된다. 우리는 설정된 다른 사용 권한이 무엇이든 관계 없이 기타 사용자를 위해 설정된 쓰기 권한을 가진 파일을 보고 싶다는 표시로 0002라는 사용 권한 모드 앞에 대시를 사용했습니다.
위의 명령어에서는 3가지 새로운 개념이 도입되었습니다. 패턴이 발견된 경우, – prune은 파일 패턴 “/proc”에서 -wholename 테스트를 사용함으로써 find 명령어가 이 디렉토리로 내려오지 않도록 막아줍니다. 불린 연산자 “-o”를 통해 find 명령어는 다른 디렉토리에서 명령어의 나머지 부분을 처리할 수 있습니다. 각 표현식 간에 가정된 암시적 and 연산자(-a)가 있기 때문에 좌측 표현식이 거짓(false)으로 평가된 경우 and 뒤에 나오는 표현식은 평가되지 않습니다. 따라서, -o 연산자가 필요합니다. 강제 우선 순위 적용을 위해 괄호를 사용하는 것처럼 find 명령어는 불린 연산자 -not, !,도 지원합니다.
시스템 관리자는 자주 find 명령어를 통해 해당 사용자나 그룹의 이름 또는 ID를 사용해 특정 사용자나 그룹의 정규 파일을 검색하고 있습니다:
[root] $  find / -type f -user bluher -exec ls -ls {}  \;
여기, 이러한 명령어의 출력에 대한 간단한 예제가 나와 있습니다:
4 -rw-r--r-- 1 bluher users 48  May  1 03:09  /home/bluher/public_html/.directory
4 -rw-r--r-- 1 bluher users 925  May  1 03:09 /home/bluher/.profile
또한, find 명령어를 사용해 그룹 별로 파일을 검색할 수도 있습니다:
[root] $ find /  -type f -group users
find / -type d -gid  100
이 명령어를 실행하면 그룹 ID 100이 소유하고 있는 디렉토리 목록이 나옵니다. 해당되는 uid 또는 gid를 찾기 위해 /etc/passwd 또는 /etc/group 파일에서 more 또는 cat 명령어를 실행할 수 있습니다
이 명령어는 알려진 특정 사용자 및 그룹에 관한 파일을 찾는 것 외에도 사용자나 그룹이 지정되지 않은 파일을 찾는 데도 유용합니다. 아래 명령어는 /etc/passwd 또는 /etc/group 파일에서 리스트를 가지고 있지 않은 파일을 식별합니다.
find / -nouser -o  -nogroup
위 명령어는 실제로 시스템 상에 결과를 제공하는 것은 아니지만, 파일을 이동한 후에 사용자나 그룹이 지정되지 않은 파일을 식별하는 데 사용할 수 있습니다
이제, 본 섹션 초반부에 언급한 별도의 높은 사용 권한 문제를 해결할 수 있게 되었습니다.
SGID 및 SUID는 UNIX 기반 운영 체제 상의 파일 및 디렉토리에 할당할 수 있는 특별 액세스 권한 플래그입니다. 컴퓨터 시스템 액세스에 있어 일반 권한을 가진 사용자가 일시적으로 높아진 권한을 가지고 바이너리 실행 파일을 수행할 수 있습니다.
find /  \( -perm -2000 -o -perm -4000 \) -ls
167901   12 -rwsr-xr-x   1 root     root         9340 Jun 16  2006 /usr/bin/rsh
167334   12 -rwxr-sr-x   1 root     tty         10532 May  4  2007 /usr/bin/wall
위 명령어에서 괄호가 escape 처리된 것을 볼 수 있습니다. 또한, 권한 간의 차이점을 확인할 수 있습니다. 첫 번째 파일에는 SGID 권한이 설정되어 있으며 두 번째 파일에는 SUID 권한이 설정되어 있습니다. 위 명령어의 마지막 연산은 -exec ls -dils 연산의 find 명령어와 유사합니다

find 명령어 제어

Linux의 많은 명령어와 달리, find 명령어는 -r 또는 -R 옵션이 없이도 서브디렉토리로 내려가지 않습니다. 이는 기본적으로 지원됩니다. 하지만, 때에 따라 이를 제한하고 싶을 수 있습니다. 이럴 경우, -depth, -maxdepth 및 –mindepth 옵션과 –prune 연산이 유용합니다
-prune이 얼마나 유용한지는 이미 확인했기 때문에 이제는 -depth, -maxdepth 및 -mindepth 옵션에 대해 살펴보겠습니다.
-maxdepth 및 -mindepth 옵션을 사용하면 find 명령어를 통해 검색하고자 하는 디렉토리 트리의 수준을 지정할 수 있습니다. find 명령어가 단 한 수준의 디렉토리를 찾도록 하고 싶은 경우에는 maxdepth 옵션을 사용할 수 있습니다.
아래 명령어를 실행해 디렉토리 트리의 상위 3개 수준의 로그 파일을 검색하면 –maxdepth의 효과를 확인할 수 있습니다. 이렇게 하면 –maxdepth 없이 실행할 때 보다는 훨씬 적은 출력 결과가 나옵니다
find / -maxdepth 3  -name "*log"
또한, find 명령어에게 디렉토리 트리에서 최소 3개 수준까지 디렉토리를 검색할 것을 지시할 수 있습니다.
find / -mindepth 3  -name "*log"
-depth 옵션은 내용 평가에 앞서 디렉토리를 평가할 수 있도록 해줍니다. 아래 명령어는 한 예입니다.:
find -name "*test*" -depth
./test/test
./test
./localbin/test
./localbin/test_shell_var
./localbin/test.txt
./test2/test/test
./test2/test
./test2