2012년 3월 15일 목요일

How SKBs work

출처 : http://vger.kernel.org/~davem/skb_data.html


Layout of SKB data area
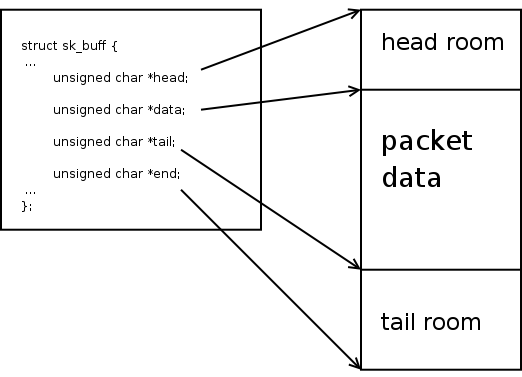
This first diagram illustrates the layout of the SKB data area and where in that area the various pointers in 'struct sk_buff' point.
The rest of this page will walk through what the SKB data area looks like in a newly allocated SKB. How to modify those pointers to add headers, add user data, and pop headers.
Also, we will discuss how page non-linear data areas are implemented. We will also discuss how to work with them.


 skb = alloc_skb(len, GFP_KERNEL);

Layout of freshly allocated SKB
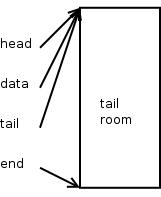
This is what a new SKB looks like right after you allocate it using alloc_skb()
As you can see, the head, data, and tail pointers all point to the beginning of the data buffer. And the end pointer points to the end of it. Note that all of the data area is considered tail room.
The length of this SKB is zero, it isn't very interesting since it doesn't contain any packet data at all. Let's reserve some space for protocol headers usingskb_reserve()


 skb_reserve(skb, header_len);

Layout of SKB after skb_reserve()
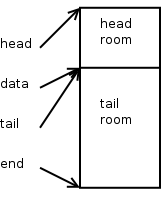
This is what a new SKB looks like right after the skb_reserve() call.
Typically, when building output packets, we reserve enough bytes for the maximum amount of header space we think we'll need. Most IPV4 protocols can do this by using the socket value sk->sk_prot->max_header.
When setting up receive packets that an ethernet device will DMA into, we typically call skb_reserve(skb, NET_IP_ALIGN). By default NET_IP_ALIGN is defined to '2'. This makes it so that, after the ethernet header, the protocol header will be aligned on at least a 4-byte boundary. Nearly all of the IPV4 and IPV6 protocol processing assumes that the headers are properly aligned.
Let's now add some user data to the packet.


 unsigned char *data = skb_put(skb, user_data_len);
 int err = 0;
 skb->csum = csum_and_copy_from_user(user_pointer, data,
         user_data_len, 0, &err);
 if (err)
  goto user_fault;

Layout of SKB after skb_reserve()
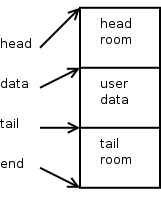
This is what a new SKB looks like right after the user data is added.
skb_put() advances 'skb->tail' by the specified number of bytes, it also increments 'skb->len' by that number of bytes as well. This routine must not be called on a SKB that has any paged data. You must also be sure that there is enough tail room in the SKB for the amount of bytes you are trying to put. Both of these conditions are checked for by skb_put() and an assertion failure will trigger if either rule is violated.
The computed checksum is remembered in 'skb->csum'. Now, it's time to build the protocol headers. We'll build a UDP header, then one for IPV4.


 struct inet_sock *inet = inet_sk(sk);
 struct flowi *fl = &inet->cork.fl;
 struct udphdr *uh;

 skb->h.raw = skb_push(skb, sizeof(struct udphdr));
 uh = skb->h.uh
 uh->source = fl->fl_ip_sport;
 uh->dest = fl->fl_ip_dport;
 uh->len = htons(user_data_len);
 uh->check = 0;
 skb->csum = csum_partial((char *)uh,
     sizeof(struct udphdr), skb->csum);
 uh->check = csum_tcpudp_magic(fl->fl4_src, fl->fl4_dst,
          user_data_len, IPPROTO_UDP, skb->csum);
 if (uh->check == 0)
  uh->check = -1;

Layout of SKB after pushing UDP headers
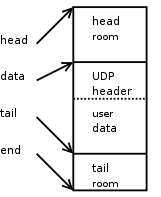
This is what a new SKB looks like after we push the UDP header to the front of the SKB.
skb_push() will decrement the 'skb->data' pointer by the specified number of bytes. It will also increment 'skb->len' by that number of bytes as well. The caller must make sure there is enough head room for the push being performed. This condition is checked for by skb_push() and an assertion failure will trigger if this rule is violated.
Now, it's time to tack on an IPV4 header.


 struct rtable *rt = inet->cork.rt;
 struct iphdr *iph;

 skb->nh.raw = skb_push(skb, sizeof(struct iphdr));
 iph = skb->nh.iph;
 iph->version = 4;
 iph->ihl = 5;
 iph->tos = inet->tos;
 iph->tot_len = htons(skb->len);
 iph->frag_off = 0;
 iph->id = htons(inet->id++);
 iph->ttl = ip_select_ttl(inet, &rt->u.dst);
 iph->protocol = sk->sk_protocol; /* IPPROTO_UDP in this case */
 iph->saddr = rt->rt_src;
 iph->daddr = rt->rt_dst;
 ip_send_check(iph);

 skb->priority = sk->sk_priority;
 skb->dst = dst_clone(&rt->u.dst);

Layout of SKB after pushing IP header
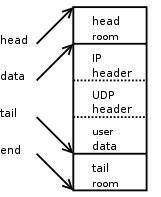
This is what a new SKB looks like after we push the IPv4 header to the front of the SKB.
Just as above for UDP, skb_push() decrements 'skb->data' and increments 'skb->len'. We update the 'skb->nh.raw' pointer to the beginning of the new space, and build the IPv4 header.
This packet is basically ready to be pushed out to the device once we have the necessary information to build the ethernet header (from the generic neighbour layer and ARP).


Things start to get a little bit more complicated once paged data begins to be used. For the most part the ability to use [page, offset, len] tuples for SKB data came about so that file system file contents could be directly sent over a socket. But, as it turns out, it is sometimes beneficial to use this for nomal buffering of process sendmsg() data.
It must be understood that once paged data starts to be used on an SKB, this puts a specific restriction on all future SKB data area operations. In particular, it is no longer possible to do skb_put() operations.
We will now mention that there are actually two length variables assosciated with an SKB, len and data_len. The latter only comes into play when there is paged data in the SKB. skb->data_len tells how many bytes of paged data there are in the SKB. From this we can derive a few more things:
  • The existence of paged data in an SKB is indicated by skb->data_len being non-zero. This is codified in the helper routine skb_is_nonlinear() so that it the function you should use to test this.
  • The amount of non-paged data at skb->data can be calculated as skb->len - skb->data_len. Again, there is a helper routine already defined for this called skb_headlen() so please use that.
The main abstraction is that, when there is paged data, the packet begins at skb->data for skb_headlen(skb) bytes, then continues on into the paged data area for skb->data_len bytes. That is why it is illogical to try and do an skb_put(skb) when there is paged data. You have to add data onto the end of the paged data area instead.
Each chunk of paged data in an SKB is described by the following structure:
struct skb_frag_struct {
 struct page *page;
 __u16 page_offset;
 __u16 size;
};
There is a pointer to the page (which you must hold a proper reference to), the offset within the page where this chunk of paged data starts, and how many bytes are there.
The paged frags are organized into an array in the shared SKB area, defined by this structure:
#define MAX_SKB_FRAGS (65536/PAGE_SIZE + 2)

struct skb_shared_info {
 atomic_t dataref;
 unsigned int nr_frags;
 unsigned short tso_size;
 unsigned short tso_segs;
 struct sk_buff *frag_list;
 skb_frag_t frags[MAX_SKB_FRAGS];
};
The nr_frags member states how many frags there are active in the frags[] array. The tso_size and tso_segs is used to convey information to the device driver for TCP segmentation offload. The frag_list is used to maintain a chain of SKBs organized for fragmentation purposes, it is _not_ used for maintaining paged data. And finally the frags[] holds the frag descriptors themselves.
A helper routine is available to help you fill in page descriptors.

void skb_fill_page_desc(struct sk_buff *skb, int i,
   struct page *page,
   int off, int size)

This fills the i'th page vector to point to page at offset off of size size. It also updates the nr_frags member to be one past i.
If you wish to simply extend an existing frag entry by some number of bytes, increment the size member by that amount.

With all of the complications imposed by non-linear SKBs, it may seem difficult to inspect areas of a packet in a straightforward way, or to copy data out from a packet into another buffer. This is not the case. There are two helper routines available which make this pretty easy.
First, we have:


void *skb_header_pointer(const struct sk_buff *skb, int offset, int len, void *buffer)
You give it the SKB, the offset (in bytes) to the piece of data you are interested in, the number of bytes you want, and a local buffer which is to be used _only_ if the data you are interested in resides in the non-linear data area.
You are returned a pointer to the data item, or NULL if you asked for an invalid offset and len parameter. This pointer could be one of two things. First, if what you asked for is directly in the skb->data linear data area, you are given a direct pointer into there. Else, you are given the buffer pointer you passed in.
Code inspecting packet headers on the output path, especially, should use this routine to read and interpret protocol headers. The netfilter layer uses this function heavily.
For larger pieces of data other than protocol headers, it may be more appropriate to use the following helper routine instead.

int skb_copy_bits(const struct sk_buff *skb, int offset,
    void *to, int len);

This will copy the specified number of bytes, and the specified offset, of the given SKB into the 'to'buffer. This is used for copies of SKB data into kernel buffers, and therefore it is not to be used for copying SKB data into userspace. There is another helper routine for that:
int skb_copy_datagram_iovec(const struct sk_buff *from,
       int offset, struct iovec *to,
       int size);

Here, the user's data area is described by the given IOVEC. The other parameters are nearly identical to those passed in to skb_copy_bits() above.

2012년 3월 14일 수요일

Building/Debugging android native C applications

출처 : http://betelco.blogspot.com/2010/01/buildingdebugging-android-native-c.html


Building/Debugging android native C applications

In this post I will explain how to compile, install and debug an Android native "C" application.
If you are reading this post just because you have googled the magic keywords ("android" + "native code") then you should know that there is an easier way to build native applications using android makefiles ("Android.mk" and "Application.mk").
The method I'm describing here is only useful if you want to understand how things work in order to create more complex standardGNU makefiles. This is also useful if you would like to create your own GNU autotools wrappers to compile projects using GNU configure.
I'm using Windows Vista as host machine but any other supported platforms (e.g. linux-x86 or darwin-x86) should work.

I have tested both the NDK (1.6) and SDK (2.1) on:
  • Windows XP (32-bit) and Vista (64-bit)
  • Mac OS X Snow Leopard
  • Ubuntu Intrepid
Installing Android SDK

To download the latest Android SDK, visit this address http://developer.android.com/sdk/index.html.
If you need information on how to install the SDK, visit this address http://developer.android.com/sdk/installing.html.
If the "SDK setup" fail to update the installed packages you can change the remote site URL from https://dl-ssl.google.com/android/repository/repository.xml to http://dl-ssl.google.com/android/repository/repository.xml (change the URL scheme from HTTPS to HTTP) or try to disable your anti-virus or firewall.

I have installed the SDK version 2.1 under c:/android-sdk (a.r.a /cygdrive/c/android-sdk).
Add an environment variable named ANDROID_SDK_ROOT pointing to the SDK root directory.

Important: You should add "$ANDROID_SDK_ROOT/tools" directory to the $PATH environment variable.
Under *nix:

export PATH=$ANDROID_SDK_ROOT/tools:$PATH
Under Cygwin: Open C:\Cygwin\Cygwin.bat and add:

set PATH=%ANDROID_SDK_TOOLS%;%PATH%
Installing Cygwin

If you are using Windows XP or Vista as host machine then you MUST install Cygwin Devel package with GNU Make (3.81 or later) before installing the NDK.
It should also work with MinGW.

Installing the Android NDK

To download the latest Android NDK, visit this address http://developer.android.com/sdk/ndk/1.6_r1/index.html.
I have uncompressed the NDK version 1.6 under c:/android-ndk (a.r.a /cygdrive/c/android-ndk).
Add an environment variable named ANDROID_NDK_ROOT pointing to the NDK root directory.
To install the NDK:

cd $ANDROID_NDK_ROOT
build/host-setup.sh
If all is OK then the console will print Host setup complete.
To test that the toolchain has been correctly installed you can try to build the hello-jni sample which comes with the NDK by doing this:

cd $ANDROID_NDK_ROOT
make -APP=hello-jni
If all is OK then the console will print:

Android NDK: Building for application 'hello-jni'
Compile thumb : hello-jni <= sources/samples/hello-jni/hello-jni.c SharedLibrary : libhello-jni.so Install : libhello-jni.so => apps/hello-jni/project/libs/armeabi
This mean that your native shared library (libhello-jni.so) have been successfully generated under$ANDROID_NDK_ROOT/apps/hello-jni/project/libs/armeabi folder.

Creating an AVD

AVD stands for Android Virtual Device and can be seen as a device profile (keyboard, dialing pad, skin, screen dimensions, appearance ...) to load into your emulator. You can create as many AVDs as you need.
To create an AVD named "avdtest" targeting platform 2.1 (targetID=android-7):

android create avd -n avdtest -t android-7
If all is OK the console will print:

Created AVD 'avdtest' based on Android 2.1, with the following hardware config: hw.lcd.density=160
Create test.c

Here I will create a basic test.c file under C:\tmp with the following content:

#include <stdio.h>// printf

int main(int argc, char **argv)
{
int i = 1;
i+=2;

printf("Hello, world (i=%d)!\n", i);

return 0;
}
Create makefile

Just create an empty file named makefile (without any extension) under C:\tmp (which is the same directory as test.c).
Now We will fill the makefile step by step.
Add application name, $ROOT directory, install directory and the NDK platform version:

APP := test
ROOT:=/cygdrive/c
NDK_PLATFORM_VER := 1.5
INSTALL_DIR := /data/tmp
Add useful environment vars:

ANDROID_NDK_ROOT:=$(ROOT)/android-ndk
ANDROID_NDK_HOST:=windows
ANDROID_SDK_ROOT:=$(ROOT)/android-sdk
PREBUILD:=$(ANDROID_NDK_ROOT)/build/prebuilt/$(ANDROID_NDK_HOST)/arm-eabi-4.2.1
BIN := $(PREBUILD)/bin
You MUST change ANDROID_NDK_HOST value from windows to linux-x86 if you are under *nix or darwin-x86 on MAC OS X.
Add GCC options:

CPP := $(BIN)/arm-eabi-g++
CC := $(BIN)/arm-eabi-gcc
CFLAGS :=
LDFLAGS := -Wl
Add targets

all: $(APP)
OBJS += $(APP).o
$(APP): $(OBJS)
$(CPP) $(LDFLAGS) -o $@ $^
%.o: %.c
$(CC) -c $(INCLUDE) $(CFLAGS) $< -o $@
install: $(APP)
$(ANDROID_SDK_ROOT)/tools/adb push $(APP) $(INSTALL_DIR)/$(APP)
$(ANDROID_SDK_ROOT)/tools/adb shell chmod 777 $(INSTALL_DIR)/$(APP)
shell:
$(ANDROID_SDK_ROOT)/tools/adb shell
run:
$(ANDROID_SDK_ROOT)/tools/adb shell $(INSTALL_DIR)/$(APP)
clean:
@rm -f $(APP).o $(APP)
Building the application
To build the application, switch to the directory where you have created both files and then:

make
At the output of the console you will get many errors saying that it's impossible to find stdlib.h, stdio.h etc etc.To resolve this issue, add the Bionic header files to $CFLAGS variable like this:

CFLAGS := -I$(ANDROID_NDK_ROOT)/build/platforms/android-$(NDK_PLATFORM_VER)/arch-arm/usr/include
If you retry (make) you will now get this link error:

crt0.o: No such file: No such file or directory
To avoid directly linking against the "C runtime" you must add "-nostdlib" flag to the link options like this:

LDFLAGS := -Wl -nostdlib
If you retry (make) you will now get these link errors:

test.c:(.text+0x34): undefined reference to `printf'
test.c:(.text+0x3c): undefined reference to `exit'
You get these errors because Bionic libc is missing. To add libc you MUST change $LDFLAGS like this:

LDFLAGS := -Wl -L$(ANDROID_NDK_ROOT)/build/platforms/android-$(NDK_PLATFORM_VER)/arch-arm/usr/lib
LDFLAGS += -nostdlib -lc

If you retry (make) you will now get this link error:

/cygdrive/c/android-ndk/build/platforms/android-1.5/arch-arm/usr/lib/libc.so: undefined reference to `dl_unwind_find_exidx'
To resolve this issue you MUST specify the first set of directories into which to search the system shared libraries (*.so) . This is done by adding the "-rpath-link" option to the link options like this:

LDFLAGS := -Wl,-rpath-link=$(ANDROID_NDK_ROOT)/build/platforms/android-$(NDK_PLATFORM_VER)/arch-arm/usr/lib -L$(ANDROID_NDK_ROOT)/build/platforms/android-$(NDK_PLATFORM_VER)/arch-arm/usr/lib
If you retry (make) you will now get this warning:

/cygdrive/c/android-ndk/build/prebuilt/windows/arm-eabi-4.2.1/bin/../lib/gcc/arm
-eabi/4.2.1/../../../../arm-eabi/bin/ld: warning: cannot find entry symbol _start; defaulting to 000082c8
This is an Android known issue. You have this warning because the linker search "_start" as entry point. You can resolve this issue by renaming your main function. But the elegant way to resolve this issue is to specify the entry point in the link options like this:

LDFLAGS := -Wl,--entry=main,-rpath-link=$(ANDROID_NDK_ROOT)/build/platforms/android-$(NDK_PLATFORM_VER)/arch-arm/usr/lib -L$(ANDROID_NDK_ROOT)/build/platforms/android-$(NDK_PLATFORM_VER)/arch-arm/usr/lib
LDFLAGS += -nostdlib -lc
Now When you retry (make) your application will successfully build without any errors or warnings.

Testing your application

Before testing your application you MUST run the emulator like this:

emulator -avd avdtest
where "avdtest" is the name of the previously created avd (see "creating an avd" section).
To install the application on the emulator, open a new console and go to to directory where you have created test.c and makefile. Install your application on the emulator like this:

make install
If all is OK the console will print:

/cygdrive/c/android-sdk/tools/adb push test /data/tmp/test
304 KB/s (2493 bytes in 0.008s)
/cygdrive/c/android-sdk/tools/adb shell chmod 777 /data/tmp/test
To run the application type:

make run
You will probably get an error message saying:

/cygdrive/c/android-sdk/tools/adb shell /data/tmp/test
/data/tmp/test: not found
This error message is a bit confusing because if you browse the /data/tmp directory you will notice that the executable is here. The question is why?
I spent hours searching and I found that this error happens because the loader fails to load the application because it cannot found a proper linker.
To specify a search directory for the dynamic linker (at run time) you MUST change the link options like this:

LDFLAGS := -Wl,--entry=main,-rpath-link=$(ANDROID_NDK_ROOT)/build/platforms/android-$(NDK_PLATFORM_VER)/arch-arm/usr/lib,-dynamic-linker=/system/bin/linker -L$(ANDROID_NDK_ROOT)/build/platforms/android-$(NDK_PLATFORM_VER)/arch-arm/usr/lib
LDFLAGS += -nostdlib -lc
Now rebuild and install your application (make clean && make && make install) then run it again (make run).
The console will print the expected result ("hello, world (i=3)!") but just after we have an segmentation fault error ("[1] Segmentation fault /data/tmp/test").
To resolve this issue you can exit the program (exit(0);) just before the main function returns (return 0;). You should alsoinclude <stdlib.h>.
If you retry the build&&run process (make clean && make && make install && make run) then you should have:

/cygdrive/c/android-sdk/tools/adb shell /data/tmp/test
Hello, world (i=3)!
which is the expected result.

Debugging your applicationBefore doing anything you MUST copy the gdbserver file to the emultor.
This file is under $BIN ($ANDROID_NDK_ROOT/build/prebuilt/$ANDROID_NDK_HOST/arm-eabi-4.2.1/bin).Copy gdbserver to the emulator like this:

adb push gdbserver $INSTALL_DIR/gdbserver
adb shell chmod 777 $INSTALL_DIR/gdbserver
where $INSTALL_DIR is the directory where you have installed your application (it's not mandatory to copy it in this directory).
Before running the server on port 1234 you MUST redirect all tcp connection to this port like this:

adb forward tcp:1234: tcp:1234
it's not mandatory to forward connections to the same port number.
Now it's time to run the server:

adb shell $INSTALL_DIR/gdbserver :1234 $INSTALL_DIR/$APP
note that only the server port is specified (no host).
If all is OK the the server will print something like this:

Process /data/tmp/test created; pid = 246
Listening on port 1234
Now to debug our application we will change the makefile by adding a new debug target like this.

GDB_CLIENT := $(BIN)/arm-eabi-gdb

debug:
$(GDB_CLIENT) $(APP)

To launch the application in debug mode type "make debug" (after make clean && make && make install of course). If you do this, you will see a warning message saying that "no debugging symbols found". No symbols ==> no debug.
To generate debug symbols you MUST change the makefile like this (should not be hard coded like this):

DEBUG = -g
CFLAGS := $(DEBUG) -I$(ANDROID_NDK_ROOT)/build/platforms/android-$(NDK_PLATFORM_VER)/arch-arm/usr/include
Now rebuild and install your application (make clean && make && make install) then run it again (make debug). This (make debug) should open gdb invite command((gdb)) on the same console.
Connect to the server (from the same console) like this:

target remote :1234
Set a breakpoint on the main function and execute step by step (commands above are informational and you can use any gdb commands):

b main
c
n
p i 
#$1 = 1
n
#9 printf("Hello, world (i=%d)!\n", i);
p i 
#$2 = 3
c
#Program exited normally.

The final makefile and test.c files are shown below:

makefile

APP := test
ROOT:=/cygdrive/c
INSTALL_DIR := /data/tmp
NDK_PLATFORM_VER := 1.5

ANDROID_NDK_ROOT:=$(ROOT)/android-ndk
ANDROID_NDK_HOST:=windows
ANDROID_SDK_ROOT:=$(ROOT)/android-sdk
PREBUILD:=$(ANDROID_NDK_ROOT)/build/prebuilt/$(ANDROID_NDK_HOST)/arm-eabi-4.2.1
BIN := $(PREBUILD)/bin
GDB_CLIENT := $(BIN)/arm-eabi-gdb

DEBUG = -g

CPP := $(BIN)/arm-eabi-g++
CC := $(BIN)/arm-eabi-gcc
CFLAGS := $(DEBUG) -I$(ANDROID_NDK_ROOT)/build/platforms/android-$(NDK_PLATFORM_VER)/arch-arm/usr/include
LDFLAGS := -Wl,--entry=main,-rpath-link=$(ANDROID_NDK_ROOT)/build/platforms/android-$(NDK_PLATFORM_VER)/arch-arm/usr/lib,-dynamic-linker=/system/bin/linker -L$(ANDROID_NDK_ROOT)/build/platforms/android-$(NDK_PLATFORM_VER)/arch-arm/usr/lib
LDFLAGS += -nostdlib -lc

all: $(APP)

OBJS += $(APP).o
$(APP): $(OBJS)
$(CPP) $(LDFLAGS) -o $@ $^
%.o: %.c
$(CC) -c $(INCLUDE) $(CFLAGS) $< -o $@
install: $(APP)
$(ANDROID_SDK_ROOT)/tools/adb push $(APP) $(INSTALL_DIR)/$(APP)
$(ANDROID_SDK_ROOT)/tools/adb shell chmod 777 $(INSTALL_DIR)/$(APP)
shell:
$(ANDROID_SDK_ROOT)/tools/adb shell
run:
$(ANDROID_SDK_ROOT)/tools/adb shell $(INSTALL_DIR)/$(APP)
debug:
$(GDB_CLIENT) $(APP)
clean:
@rm -f $(APP).o $(APP)

test.c

#include <stdio.h> // printf
#include <stdlib.h> //exit

int main(int argc, char **argv)
{
int i = 1;
i+=2;

printf("Hello, world (i=%d)!\n", i);

exit(0);
return 0;
}

Android Native Development Using the Android Open Source Project

출처 : http://www.aton.com/android-native-development-using-the-android-open-source-project/


Android Native Development Using the Android Open Source Project

Part Four of a Series of Posts about Android Mobile Application Development.
In three prior blog posts, Developing An Android Mobile Application , Android Software Development Tools – What Do I Need? and  Android Native Development on Ubuntu 9.04 (Jaunty Jackalope), I discussed our approach for choosing Android as the next platform for our company’s mobile application, Aton Connect.  Once I identified which platform was most suitable, I needed to decide on development tools that would allow us to develope our mobile application rapidly. Because the Aton Connect software architecture combines native and managed code, I am looking for ways to include native C/C++ code in our Android version.

Tools for Native Code Development

There are now two primary sets of tools that can be used to develop Android applications that include native C/C++ native code.  The original, and still unsupported way, is to leverage the tools built into the Android Open Source Project to build Android applications.  The intent of the Android Open Source Project is to provide the means to port the Android operating system to hardware devices, ranging from cell phones, to netbooks, to set top boxes, etc.
Developing Android applications that include native code by using the Android Open Source Project allows the developer full access to every aspect of the operating system.  Because the operating system is currently under development, the Android team will be changing various aspects of the operating system source.  If you develop an Android application that happens to utilize one of the features that have changed, then your application may very well break when run on a device with a newer release of Android.
For this reason, the Android team has recently released the Android NDK or Android Native Development Kit.  The goal of the NDK is to allow native code libraries to be incorporated into an Android Java application.  A secondary goal is to limit access of native code to selected API’s and libraries that are considered mature, and thus are guaranteed to be supported in future releases of the Android OS.  The Android NDK is available here:http://developer.android.com/sdk/ndk/1.5_r1/index.html.
In this post, I will be working with the Android Open Source Project (OSP) to build Android applications that utilize native code.  In a later post, I will address the NDK, with its advantages and limitations.  Using the OSP is useful where you are building applications for a custom port of Android.  It is also helpful if you need access to API’s and libraries that are not included in the current release of the NDK and you are willing to accept that those API’s and libraries may change in future releases of the Android OS.

A Simple, Pure Native Code Application for Android

As our first example, I will build a non-trivial, but still simple C language application that does not involve Java.  I will do this by cloning the classic “ping” application used to test TCP/IP connectivity in Android.
It is important to note that using the OSP for native development requires that I respect the file structure of the OSP.  To do otherwise can generate a prohibitive amount of work to get the build system to perform properly.
In this discussion I will be referring to the environment variable $ANDROID_HOME, which is based on the instructions I presented in previous posts is equivalent to $HOME/mydroid.  The descriptions below are for Ubuntu 9.04.
Applications that support the OS, such as “ping” reside in the folder  $ANDROID_HOME/external.  To avoid collisions with the rest of the OSP, I will create a folder for our native applications at $ANDROID_HOME/external/myapps.
The  first step is to copy the folder and contents $ANDROID_HOME/external/ping to $ANDROID_HOME/external/myapps/ping.  Then, to identify our modified code and to avoid  overwriting the original ping command files, rename the folder $ANDROID_HOME/external/myapps/ping to $ANDROID_HOME/external/myapps/myping.  In this folder, rename ping.c to my_ping.c and ping_common.h to my_ping_common.h.  Use a text editor to change ping_common.h to my_ping_common.h in the #include statement in “my_ping.c”.  You should also change “ping” to “my_ping” in the  text prompt and error message strings to help identify the output as  actually coming  from this modified application.
Finally I need to adjust the Android.mk file in the folder $ANDROID_HOME/external/myapps/myping to reflect our other changes here.  Note that this file is quite compact, reflecting only differences from the standard make procedures buried in the Android OS build system.  The build system is very powerful and elegant, but quite complex if you choose to burrow into the details of how it actually works.
In the Android.mk file, make the following edits.
Change the line LOCAL_SRC_FILES:= ping.c to LOCAL_SRC_FILES:= my_ping.c.
Change the line LOCAL_MODULE := ping to LOCAL_MODULE := my_ping.
Note that the  existing  Android.mk  file specifies static libraries with this line:
LOCAL_STATIC_LIBRARIES := libcutils libc
Next, open a terminal window and change the directory to $ANDROID_HOME/external/myapps/myping.
To setup the build environment use this command:   source $ANDROID_HOME/build/envsetup.sh
Then enter the command “mm”.  This simple command initiates a complex set of events that will build the application “my_ping” in about a minute.  The terminal session output  will look something  like this:
cawilde@android:~$ cd $ANDROID_HOME/external/myapps/myping
cawilde@android:~/mydroid/external/myapps/myping$ source $ANDROID_HOME/build/envsetup.sh
cawilde@android:~/mydroid/external/myapps/myping$ mm
make: Entering directory `/home/cawilde/mydroid'
build/core/product_config.mk:261: WARNING: adding test OTA key
============================================
TARGET_PRODUCT=generic
TARGET_BUILD_VARIANT=eng
TARGET_SIMULATOR=
TARGET_BUILD_TYPE=release
TARGET_ARCH=arm
HOST_ARCH=x86
HOST_OS=linux
HOST_BUILD_TYPE=release
BUILD_ID=
============================================
target thumb C: my_ping <= /home/cawilde/mydroid/external/myapps/myping/my_ping.c
/home/cawilde/mydroid/external/myapps/myping/my_ping.c: In function 'fill':
/home/cawilde/mydroid/external/myapps/myping/my_ping.c:136: warning: pointer targets in initialization differ in signedness
/home/cawilde/mydroid/external/myapps/myping/my_ping.c: In function '__schedule_exit':
/home/cawilde/mydroid/external/myapps/myping/my_ping.c:315: warning: comparison betIen signed and unsigned
/home/cawilde/mydroid/external/myapps/myping/my_ping.c:320: warning: comparison betIen signed and unsigned
/home/cawilde/mydroid/external/myapps/myping/my_ping.c: In function 'setup':
/home/cawilde/mydroid/external/myapps/myping/my_ping.c:533: warning: pointer targets in initialization differ in signedness
/home/cawilde/mydroid/external/myapps/myping/my_ping.c: In function 'gather_statistics':
/home/cawilde/mydroid/external/myapps/myping/my_ping.c:725: warning: comparison betIen signed and unsigned
/home/cawilde/mydroid/external/myapps/myping/my_ping.c: At top level:
/home/cawilde/mydroid/external/myapps/myping/my_ping.c:958: warning: missing initializer
/home/cawilde/mydroid/external/myapps/myping/my_ping.c:958: warning: (near initialization for 'cmsg.ipi.ipi_spec_dst')
/home/cawilde/mydroid/external/myapps/myping/my_ping.c: In function 'receive_error_msg':
/home/cawilde/mydroid/external/myapps/myping/my_ping.c:1017: warning: comparison betIen signed and unsigned
/home/cawilde/mydroid/external/myapps/myping/my_ping.c: In function 'parse_reply':
/home/cawilde/mydroid/external/myapps/myping/my_ping.c:1179: warning: comparison betIen signed and unsigned
/home/cawilde/mydroid/external/myapps/myping/my_ping.c:1183: warning: comparison betIen signed and unsigned
/home/cawilde/mydroid/external/myapps/myping/my_ping.c: In function 'main':
/home/cawilde/mydroid/external/myapps/myping/my_ping.c:2038: warning: comparison betIen signed and unsigned
/home/cawilde/mydroid/external/myapps/myping/my_ping.c:2046: warning: comparison betIen signed and unsigned
target Executable: my_ping (out/target/product/generic/obj/EXECUTABLES/my_ping_intermediates/LINKED/my_ping)
target Non-prelinked: my_ping (out/target/product/generic/symbols/system/bin/my_ping)
target Strip: my_ping (out/target/product/generic/obj/EXECUTABLES/my_ping_intermediates/my_ping)
Install: out/target/product/generic/system/bin/my_ping
Finding NOTICE files: out/target/product/generic/obj/NOTICE_FILES/hash-timestamp
Combining NOTICE files: out/target/product/generic/obj/NOTICE.html
gzip -c out/target/product/generic/obj/NOTICE.html > out/target/product/generic/obj/NOTICE.html.gz
make: Leaving directory `/home/cawilde/mydroid'
cawilde@android:~/mydroid/external/myapps/myping$
The build lists a number of warnings related to signed/unsigned variable mismatches which exist in the source file.  These can be ignored for purposes of this demonstration. The build listing also describes where the various types of build outputs are located.  These are close to the end of the session:
target Executable: my_ping (out/target/product/generic/obj/EXECUTABLES/my_ping_intermediates/LINKED/my_ping) (61 KB)
target Non-prelinked: my_ping (out/target/product/generic/symbols/system/bin/my_ping)  (61 KB)
target Strip: my_ping (out/target/product/generic/obj/EXECUTABLES/my_ping_intermediates/my_ping)   (27 KB)
Install: out/target/product/generic/system/bin/my_ping  (27 KB)
The build  outputs of interest are described by the lines:
Install: out/target/product/generic/system/bin/my_ping  (no symbols)
target Executable: out/target/product/generic/obj/EXECUTABLES/my_ping_intermediates/LINKED/my_ping  (includes debug symbols)
These lines mean the build outputs are located at $ANDROID_HOME at the paths given above.
Start a new terminal window and point it to the Android SDK development tools directory, located where you installed it.  For example:
$HOME/android-sdk-linux_x86-1.5_r2/tools.  
You may have a different location or SDK revision number.
You can determine the names of the emulator skins or AVD instances by using the command: “android list avds”.  If you have not set up your AVD, refer to this page for instructions:http://developer.android.com/guide/developing/tools/avd.html
You can then start the emulator with this command: emulator -avd <avd_name> where avd_name is the name you gave the AVD when you created it, and is listed by the command: “android list avds”.  Note that the “.avd” extension is not included as part of <avd_name>.
Once the Android emulator has booted up, you can try out your new my_ping application using the following procedure:
  1. Start up a new terminal window.  Start a remote shell session using the following command:  
    adb shell
    .
  2. This will reflect the input/output from a shell running as root in the emulator into the workstation terminal session window.
  3. Create a temporary folder in the /data folder on the emulator: 
    mkdir /data/tmp
  4. Then push a copy of your my_ping executable to the temporary directory using the following command in another terminal session:
    adb push $ANDROID_HOME/out/target/product/generic/system/bin/my_ping   /data/tmp.
  5. The push command responds with this type of output:
    654 KB/s (26628 bytes in 0.039s).
  6. Finally, you can execute the code (my_ping localhost) using the remote shell session you previously used to create the temporary data folder as follows:
    # /data/tmp/my_ping  localhost
After a few pings on localhost are executed, type control C into the shell session to terminate the ping  command.  The output of my_ping in the  shell session should  look like this:
PING localhost (127.0.0.1) 56(84) bytes of data.
64 bytes from localhost (127.0.0.1): icmp_seq=1 ttl=64 time=1.79 ms
64 bytes from localhost (127.0.0.1): icmp_seq=2 ttl=64 time=0.166 ms
64 bytes from localhost (127.0.0.1): icmp_seq=3 ttl=64 time=0.153 ms
64 bytes from localhost (127.0.0.1): icmp_seq=4 ttl=64 time=0.151 ms
^C
--- localhost my_ping statistics ---
4 packets transmitted, 4 received, 0% packet loss, time 3026
msrtt min/avg/max/mdev = 0.151/0.566/1.794/0.709 ms
If you want to make a change to Android.mk, for example to change a compilation or link option, you need to use the “touch my_ping.c” command to cause the rebuild to occur.  If I do not touch a source file, the build system thinks nothing is to be done, even though I modified the Android.mk file.
So, how do you install a pure native application into the Android phone?
If you are a device manufacturer, you can build it into the full Android image for your device.  Otherwise, you need a Java application as a wrapper.  The Java wrapper application will provide the AndroidManifest.xml file and META-INF folder required by the Android package installer.  There are other good reasons to use a Java wrapper, including access to framework libraries and easy design of GUI elements.
The use of a pure native application is also useful for debugging native shared libraries used with Java applications.  I will describe this in a later post.

Android Native Development Debugging Techniques

The next step is to debug your native application.  I do not have the assistance of the Eclipse CDT GUI here, so I need to work with the classic GDB  command line debug tool.  I could build and load a version of GDB directly onto the Android platform and operate it through a terminal window, but this approach has problems.  A major issue is building and debugging GDB itself on the Android platform.  GDB is a fairly large program and  resources on Android are limited. So, a better approach is to use a remote debugging  strategy.
Because I am debugging on a different platform from our workstation I need a tool on the Android platform that will interact with the GDB debugger running on the workstation.  This tool is named gdbserver, and is included in the Android 1.5 emulator in the folder “/system/bin”.
The setup and use of gdb with gdbserver is a bit complex.  There is a function named gdbclient in the shell library $ANDROID_HOME/build/envsetup.sh which is used to startup both gdbserver and then gdb itself.  I have adapted the gdbclient function into a shell script used for debugging our my_ping application instead of its original purpose of debugging the Android kernel code.  This adaptation is covered by the Android license (Apache) as shown here:http://www.apache.org/licenses/LICENSE-2.0.
Create a shell file named “debug” in the myping folder that contains this text:
source $ANDROID_HOME/build/envsetup.sh
setpaths
OUT_ROOT=$ANDROID_HOME/$(get_build_var PRODUCT_OUT)
echo “OUT_ROOT = $OUT_ROOT”
OUT_SYMBOLS=$ANDROID_HOME/$(get_build_var TARGET_OUT_UNSTRIPPED)
echo “OUT_SYMBOLS = $OUT_SYMBOLS”
OUT_SO_SYMBOLS=$ANDROID_HOME/$(get_build_var TARGET_OUT_SHARED_LIBRARIES_UNSTRIPPED)
echo “OUT_SO_SYMBOLS = $OUT_SO_SYMBOLS”
OUT_EXE_SYMBOLS=$ANDROID_HOME/$(get_build_var TARGET_OUT_EXECUTABLES_UNSTRIPPED)
echo “OUT_EXE_SYMBOLS = $OUT_EXE_SYMBOLS”
PREBUILTS=$ANDROID_HOME/$(get_build_var ANDROID_PREBUILTS)
echo “PREBUILTS = $PREBUILTS”
LOCAL_EXE=”$1″
if [ -z "$LOCAL_EXE" ] ; then
echo “usage: debug local_exe remote_exe arguments”
exit
fi
REM_EXE=”$2″
if [ -z "$REM_EXE" ] ; then
echo “usage: debug local_exe remote_exe arguments”
exit
fi
ARG_LIST=”$3″
if [ -z "$ARG_LIST" ] ; then
echo “usage: debug local_exe remote_exe arguments”
exit
fi
PORT=”:5039″
adb forward “tcp$PORT” “tcp$PORT”
echo “PORT = $PORT, LOCAL_EXE = $LOCAL_EXE, REM_EXE = $REM_EXE, ARG_LIST = $ARG_LIST”
adb shell gdbserver $PORT $REM_EXE $ARG_LIST &
sleep 2
echo >|”$OUT_ROOT/gdbclient.cmds” “set solib-absolute-prefix $OUT_SYMBOLS”
echo >>”$OUT_ROOT/gdbclient.cmds” “set solib-search-path $OUT_SO_SYMBOLS”
echo >>”$OUT_ROOT/gdbclient.cmds” “target remote $PORT”
echo >>”$OUT_ROOT/gdbclient.cmds” “”
arm-eabi-gdb -silent -x “$OUT_ROOT/gdbclient.cmds” “$OUT_EXE_SYMBOLS/$LOCAL_EXE”
To use this for debugging “my_ping” you will need to recompile my_ping using the appropriate debugger options.  Add this line to Android.mk immediately after the “LOCAL_SRC_FILES:= my_ping.c” line:
LOCAL_CFLAGS:=-O0  –g
The –O0 option disables GCC compiler optimizations and the –g option outputs additional debug information into the linked output.  Without these two options, the GDB debugger operation can be very erratic.  As mentioned above, you need to use the “touch my_ping.c” command to cause the rebuild to occur.  If I do not touch a source file, the build system thinks nothing is to be done, even though I modified the Android.mk file.  The rebuilt outputs are somewhat bigger, reflecting the reduced optimization and additional debug information.
Next, start up the emulator as described above.
You can then start the emulator with this command: emulator -avd <avd_name> where avd_name is the name you gave the AVD when you created it, and is listed by the command: “android list avds”.  Note that the “.avd” extension is not included as part of <avd_name>.
With the emulator started, you can copy the build outputs to the correct locations.  Use this command to copy the “symbols stripped” output to the emulator:
adb push $ANDROID_HOME/out/target/product/generic/system/bin/my_ping /data/tmp
Then, use this command to copy the output with symbols to the local folder for use by the GDB debugger:
cp $ANDROID_HOME/out/target/product/generic/obj/EXECUTABLES/my_ping_intermediates/LINKED/my_ping  ./
Now you are ready to initiate a debug session using GDB on your workstation communicating with gdbserver on the Android emulator:
./debug my_ping /data/tmp/my_ping localhost
The initial  output of the  debug session looks like this:
OUT_ROOT = /home/cawilde/mydroid/out/target/product/generic
OUT_SYMBOLS = /home/cawilde/mydroid/out/target/product/generic/symbols
OUT_SO_SYMBOLS = /home/cawilde/mydroid/out/target/product/generic/symbols/system/lib
OUT_EXE_SYMBOLS = /home/cawilde/mydroid/out/target/product/generic/symbols/system/bin
PREBUILTS = /home/cawilde/mydroid/prebuilt/linux-x86
PORT = :5039, LOCAL_EXE = my_ping, REM_EXE = /data/tmp/my_ping, ARG_LIST = localhost
Process /data/tmp/my_ping created; pid = 695
Listening on port 5039
Remote debugging from host 127.0.0.1
gdb: Unable to get location for thread creation breakpoint: requested event is not supported
__dl__start () at bionic/linker/arch/arm/begin.S:35
35                           mov       r0, sp
gdb: Unable to get location for thread creation breakpoint: requested event is not supported
Current language:  auto; currently asm
(gdb)
The  debug session starts the Android loader for /data/tmp/my_ping and the initial debug location is in the Android loader, not our application.  The loader is not configured to operate with GDB and so errors are displayed.  Single stepping at this point will simply walk through the assembly code rendition of the Android loader.  It is much more useful to set a breakpoint at the beginning of our application and then continue to the breakpoint, as follows:
(gdb) b my_ping.c:main
Breakpoint 1 at 0xe120: file /home/cawilde/mydroid/external/myapps/myping/my_ping.c, line 1673.
(gdb) c
Continuing.
warning: .dynamic section for “/home/cawilde/mydroid/out/target/product/generic/symbols/system/lib/libc.so” is not at the expected address (wrong library or version mismatch?)
[New Thread 695]
warning: .dynamic section for “/home/cawilde/mydroid/out/target/product/generic/symbols/system/lib/libstdc++.so” is not at the expected address (wrong library or version mismatch?)
warning: .dynamic section for “/home/cawilde/mydroid/out/target/product/generic/symbols/system/lib/libm.so” is not at the expected address
warning: difference appears to be caused by prelink, adjusting expectations
warning: .dynamic section for “/home/cawilde/mydroid/out/target/product/generic/symbols/system/lib/liblog.so” is not at the expected address
warning: difference appears to be caused by prelink, adjusting expectations
warning: .dynamic section for “/home/cawilde/mydroid/out/target/product/generic/symbols/system/lib/libcutils.so” is not at the expected address (wrong library or version mismatch?)
[Switching to Thread 695]
Breakpoint 1, main (argc=2, argv=0xbeaead84)
at /home/cawilde/mydroid/external/myapps/myping/my_ping.c:1673
1673       {
Current language:  auto; currently c
(gdb) l
1668       “            [ -T timestamp option ] [ -Q tos ] [hop1 ...] destinationn”);
1669                       exit(2);
1670       }
1671
1672       int main(int argc, char *argv[])
1673       {
1674                       struct hostent *hp;
1675                       int ch, hold, packlen;
1676                       int socket_errno;
1677                       u_char *packet;
(gdb) l
1678                       char *target, hnamebuf[MAXHOSTNAMELEN];
1679                       char rspace[3 + 4 * NROUTES + 1];            /* record route space */
1680
1681                       icmp_sock = socket(AF_INET, SOCK_RAW, IPPROTO_ICMP);
1682                       socket_errno = errno;
1683
1684                       /* if I Ire setuid root, undo that */
1685                       if (setuid(getuid())) return -1;
1686
1687                       source.sin_family = AF_INET;
I can then single step code and examine variables in the usual GDB fashion:
(gdb) n
1681                       icmp_sock = socket(AF_INET, SOCK_RAW, IPPROTO_ICMP);
(gdb) n
1682                       socket_errno = errno;
(gdb) p socket_errno
$1 = 32768
(gdb) n
1685                       if (setuid(getuid())) return -1;
(gdb) n
1687                       source.sin_family = AF_INET;
(gdb) n
1689                       preload = 1;
(gdb) p preload
$2 = 0
(gdb) n
1690                       while ((ch = getopt(argc, argv, COMMON_OPTSTR “bRT:”)) != EOF) {
(gdb) p preload
$3 = 1
(gdb) n
1769                       argc -= optind;
… etc ….
If you are not familiar with the GDB debugging tool, there are many references available on the Internet and a condensed guide is available here: http://www.yolinux.com/TUTORIALS/GDB-Commands.html.
My preference is using an integrated GUI development environment, and the command line GDB, although quite useful, is a long way from that.  Ideally the CDT add-on for Eclipse could  be reconciled with the  Android OSP  build environment.  This would take more  development time to accomplish than I have available, so I will continue to use GDB for Android native debugging  tasks.
In the next post, I will detail how to build native shared libraries for use with a Java wrapper or Java GUI application.